Bootstrap a mu.semte.ch microservices environment in three easy steps.
Setting up your environment is done in three easy steps:
- First configure the running microservices and their names in
docker-compose.yml - Then, configure how requests are dispatched in
config/dispatcher.ex - Lastly, simply start the docker-compose.
Alter the docker-compose.yml file so it contains all microservices you need. The example content should be clear, but you can find more information in the Docker Compose documentation. Don't remove the identifier and db container, they are respectively the entry-point and the database of your application. Don't forget to link the necessary microservices to the dispatcher and the database to the microservices.
Next, alter the file config/dispatcher/dispatcher.ex based on the example that is there by default. Dispatch requests to the necessary microservices based on the names you used for the microservice.
Boot your microservices-enabled system using docker-compose.
cd /path/to/mu-project
docker-compose up
You can shut down using docker-compose stop and remove everything using docker-compose rm.
If you aren't familiar with the semantic.works stack/microservices yet, you might want to check out why semantic tech?
- Creating a JSON API
- Adding authentication to your mu-project
- Creating a mail service
- Adding Ember Fastboot to your project
- Adding a machine learning microservice to your mu.semte.ch project
Repetition is boring. Web applications oftentimes require the same functionality: to create, read, update and delete resources. Even if they operate in different domains. Or, in terms of a REST API, endpoints to GET, POST, PATCH and DELETE resources. Since productivity is one of the driving forces behind the mu.semte.ch architecture, the platform provides a microservice – mu-cl-resources – that generates a JSONAPI compliant API for your resources based on a simple configuration describing the domain. In this tutorial we will explain how to setup such a configuration.
Like all microservices in the mu.semte.ch stack, mu-cl-resources is published as a Docker image. It just needs two configuration files in ./config/resources/:
domain.lisp: describing the resources and relationships between them in your domainrepository.lisp: defining prefixes for the vocabularies used in your domain
To provide the configuration files, you can mount the files in the /config folder of the Docker image:
services:
  # ...
  resource:
    image: semtech/mu-cl-resources:1.20.0
    links:
      - db:database
    volumes:
      - ./config:/config
  # ...
Alternatively you can build your own Docker image by extending the mu-cl-resources image and copying the configuration files in /config. See the mu-cl-resources repo.
The former option may be easier during development, while the latter is better suited in a production environment. With this last variant you can publish and release your service with its own version, independent of the mu-cl-resources version.
When adding mu-cl-resources to our application, we also have to update the dispatcher configuration such that incoming requests get dispatched to our new service. We will update the dispatcher configuration at the end of this tutorial once we know on which endpoints our resources will be available.
Next step is to describe your domain in the configuration files. The configuration is written in Common Lisp. Don’t be intimidated, just follow the examples, make abstraction of all the parentheses and your’re good to go 🙂 As an example, we will describe the domain of the ember-data-table demo which consists of books and their authors.
The repository.lisp file describes the prefixes for the vocabularies used in our domain model.
To start, each configuration file starts with:
(in-package :mu-cl-resources)Next, the prefixes are listed one per line as follows:
(in-package :mu-cl-resources)

(add-prefix "dcterms" "http://purl.org/dc/terms/")
(add-prefix "schema" "http://schema.org/")The domain.lisp file describes your resources and the relationships between them. In this post we will describe the model of a book. Later on we will add an author model and specify the relationship between books and authors.
Also start the domain.lisp file with the following line:
(in-package :mu-cl-resources)Next, add the basis of the book model:
(in-package :mu-cl-resources)

(define-resource book ()
  :class (s-prefix "schema:Book")
  :resource-base (s-url "http://mu.semte.ch/services/github/madnificent/book-service/books/")
:on-path "books")
Although you may not have written a letter of Common Lisp before, you will probably be able to understand the lines of code above.
- We define a book resource
- Each book will get schema:Book as RDF class
- Each book instance will be identified with a URI starting with “http://mu.semte.ch/services/github/madnificent/book-service/books/” – mu-cl-resources just appends a generated UUID to it
- The resources will be published on the /books API endpoint
Finally, define the properties of a book:
(in-package :mu-cl-resources)

(define-resource book ()
  :class (s-prefix "schema:Book")
  :properties `((:title :string ,(s-prefix "schema:headline"))
                (:isbn :string ,(s-prefix "schema:isbn"))
                (:publication-date :date ,(s-prefix "schema:datePublished"))
                (:genre :string ,(s-prefix "schema:genre"))
                (:language :string ,(s-prefix "schema:inLanguage"))
                (:number-of-pages :integer ,(s-prefix "schema:numberOfPages")))
  :resource-base (s-url "http://mu.semte.ch/services/github/madnificent/book-service/books/")
:on-path "books")
Each property is described according to the format:
(:dasherized-property-name :type, (s-prefix "my-prefix:my-predicate"))and will result in a triple:
<http://mu.semte.ch/services/github/madnificent/book-service/books/ead2e61a-ab1e-4261-9b6d-9c142ae94765> my-prefix:my-predicate "some-value"
Our book resources will be available on the /books paths. The mu-cl-resources service provides GET, POST, PATCH and DELETE operations on this path for free Assuming the books service is known as ‘resource’ in our dispatcher, we will add the following dispatch rule to our dispatcher configuration to forward the incoming requests to the books service:
match "/books/*path" do
 Proxy.forward conn, path, "http://resource/books/"
end
Good job! The books can now be produced and consumed by the frontend through your JSONAPI compliant API. Now we will add relationships to the model.
Each book is written by (at least one) an author. An author isn’t a regular property of a book like - for example - the book’s title. It's a resource on its own. An author has its own properties like a name, a birth date etc. And it is related to a book. Before we can define the relationship between books and authors, we first need to specify the model of an author.
The definition of the model is very similar to that of the book. Add the following lines to your domain.lisp:
(define-resource author ()
  :class (s-prefix "schema:Author")
  :properties `((:name :string ,(s-prefix "schema:name")))
  :resource-base (s-url "http://mu.semte.ch/services/github/madnificent/book-service/authors/")
:on-path "authors")
Expose the author endpoints in the dispatcher.ex configuration:
match "/authors/*path" do
  Proxy.forward conn, path, "http://resource/authors/"
end
Now that the author model is added, we can define the relationship between a book and an author. Let’s suppose a one-to-many relationship. A book has one author and an author may have written multiple books.
First, extend the book’s model:
(define-resource book ()
  :class (s-prefix "schema:Book")
  :properties `((:title :string ,(s-prefix "schema:headline"))
                (:isbn :string ,(s-prefix "schema:isbn"))
                (:publication-date :date ,(s-prefix "schema:datePublished"))
                (:genre :string ,(s-prefix "schema:genre"))
                (:language :string ,(s-prefix "schema:inLanguage"))
                (:number-of-pages :integer ,(s-prefix "schema:numberOfPages")))
  :has-one `((author :via ,(s-prefix "schema:author")
              :as "author"))
  :resource-base (s-url "http://mu.semte.ch/services/github/madnificent/book-service/books/")
:on-path "books")
Adding an author to a book will now result in the following triple in the store:
<http://mu.semte.ch/services/github/madnificent/book-service/books/182232da-e07d-438f-8608-f6356624a666>
    schema:author <http://mu.semte.ch/services/github/madnificent/book-service/authors/e6c446ad-36ee-43b3-a8a0-2349ecfdcb5d> .
The :as “author” portion of the definition specifies the path on which the relationship will be exposed in the JSON representation of a book.
{
  "attributes": {
    "title": "Rock & Roll with Ember"
  },
  "id": "620f7a1c-9d31-4b8a-a627-2eb6904fe1f3",
  "type": "books",
  "relationships": {
     "author": {
       "links": {
         "self": "/books/620f7a1c-9d31-4b8a-a627-2eb6904fe1f3/links/author",
         "related": "/books/620f7a1c-9d31-4b8a-a627-2eb6904fe1f3/author"
       }
     }
  }
}
Next, add the inverse relationship to the author’s model:
(define-resource author ()
  :class (s-prefix "schema:Author")
  :properties `((:name :string ,(s-prefix "schema:name")))
  :has-many `((book :via (s-prefix "schema:author")
               :inverse t
               :as "books"))
  :resource-base (s-url "http://mu.semte.ch/services/github/madnificent/book-service/authors/")
:on-path "authors")
The ‘:inverse t’ indicates that the relationship from author to books is the inverse relation. As you can see the the relationship’s path “books” is in plural since it’s a has-many relation in this case.
If you want to define a many-to-many relationships between books and authors, just change the :has-one to :has-many and pluralize the “author” path to “authors” in the book’s model. Don’t forget to restart your microservice if you’ve updated the model.
Now simply restart your microservice by running docker-compose restart, and you're done!
That's it! Now you can fetch and update the relationships as specified by jsonapi.org. The generated API also supports the include query parameter to include related resources in the response when fetching one or more resource. That’s a lot you get for just a few lines of code, isn’t it?
This tutorial has been adapted from Erika Pauwels' mu.semte.ch articles. You can view them here and here.

Web applications oftentimes require a user to be authenticated to access (part of) their application. For example a webshop may require a user to be logged in before placing an order. In a previous blog post we already explained the semantic model to represent logged in users. In this post we will show how to enable authentication in your app. We assume you already have a mu-project running.
Adding authentication to your application consists of two tasks:
- Adding registration so users can create a new account
- Adding a login service so users can authenticate themselves
Both tasks require changes in the backend as well as in the frontend. Let’s start with the registration.
First, we will add registration to the project. The backend will be enriched with a microservice to manage accounts. The frontend will be augmented with an Ember addon providing components to register, unregister and change a password.
The registration service provides a service to create new accounts with a nickname and a password. To integrate the service in your project, add the following snippet to the docker-compose.yml.
registration:
  image: semtech/mu-registration-service:2.6.0
  links:
    - database:database
(Re)start the project.
docker-compose upNext, configure the following routes in your dispatcher configuration in config/dispatcher/dispatcher.ex.
match "/accounts/\*path" do
  Proxy.forward conn, path, "http://registration/accounts/"
end
Restart the dispatcher service .
docker-compose restart dispatcherFrom now on all requests starting with ‘/accounts’ will be forwarded to the registration service.
We now have an endpoint for registration in the backend. We need a complementary component in the frontend that provides a GUI to communicate with this backend. This component is offered by the ember-mu-registration addon.
First, install the addon by executing the following command in your Ember project.
ember install ember-mu-registrationNext, just include the {{mu-register}}, {{mu-unregister}} and {{mu-change-password}} component in your template.
The components will automatically send the correct requests to the backend. You can customize the component’s template and/or behavior as explained in the addon’s README.
Finally create a new user account through the newly added mu-register component. We can use this user to validate the login in the next step.
Users can now create a new account, but how can they authenticate themselves in the app? In the next step we will enrich the backend with a login microservice and the frontend with a login form and a logout button.
The login service provides a service to associate a session with a user’s account if the correct user credentials are provided. Have a look at the semantic works docs if you want to know the semantic model behind the users, sessions and accounts. To integrate the service in your project, add the following snippet to the docker-compose.yml.
login:
  image: semtech/mu-login-service:2.8.0
  links:
    - database:database
(Re)start the project.
docker-compose upNext, configure the following routes in your dispatcher configuration in config/dispatcher/dispatcher.ex.
match "/sessions/\*path" do
  Proxy.forward conn, path, "http://login/sessions/"
end
Restart the dispatcher service .
docker-compose restart dispatcherFrom now on all requests starting with ‘/sessions’ will be forwarded to the login service.
Users can now be authenticated in the backend. Next, we need GUI components to login and logout and a mechanism to protect parts of the application so they are only accessible by authenticated users. These components are offered by the ember-mu-login addon which requires ember-simple-auth to be installed, too.
First, install the addons by executing the following commands in your Ember project.
ember install ember-simple-auth
ember install ember-mu-loginNext, we will generate a login route with a login form where the user can enter his credentials to authenticate.
ember generate route loginAdd the mu-login component to the template.
Once the user logged in, we will show a button so the user can logout. We will use ember-simple-auth’s ‘isAuthenticated’ property to check the current session’s state. The session service needs to be injected in the application controller.
// app/controllers/application.js
import Ember from 'ember';

export default Ember.Controller.extend({
  session: Ember.inject.service('session')

  // …
});
Next, update the application’s template to show the logout button if the user is authenticated.
Finally, mix the ApplicationRouteMixin in your application’s route. This mixin will automatically handle the authenticationSucceeded and invalidationSucceeded events.
// app/routes/application.js
import Ember from 'ember';
import ApplicationRouteMixin from 'ember-simple-auth/mixins/application-route-mixin';

export default Ember.Route.extend(ApplicationRouteMixin);Users can now login in the application, but they are still able to access all pages regardless whether they are authenticated or not. To make a route in the application accessible only when the session is authenticated, mix the AuthenticatedRouteMixin into the respective route:
// app/routes/protected.js
import Ember from 'ember';
import AuthenticatedRouteMixin from 'ember-simple-auth/mixins/authenticated-route-mixin';

export default Ember.Route.extend(AuthenticatedRouteMixin);
This will make the route (and all of its subroutes) transition to the ‘login’ route if the session is not authenticated.
And that's it! Now you know how your mu-project can be easily augmented with authentication using a custom user registration service.
This tutorial has been adapted from Erika Pauwels' mu.semte.ch article. You can view it here
My goal for this short coding session is to have a mail handling service that will allow me to list and maninpulate mails through a JSON:API REST back-end. And have that service pick up when I write a mail to the database and send it automatically. You can see the result of this project at https://github.com/langens-jonathan/ReactiveMailServiceExample.
For this project I started with cloning the mu-project repository:
git clone https://github.com/mu-semtech/mu-projectThis will give me the CRUD endpoint I need to manipulate my mail related resources. After cloning I rename the repository to MailBox and set the remote origin to a new one. For now I will leave the README.md file as it is.
For the first block we will modify the config/resources/domain.lisp, config/resourecs/repository.lisp and the config/dispatcher/dispatcher.ex files.
To add the necessary resource definitions, add them to the domain.lisp file as follows:
(define-resource mail ()
   :class (s-prefix "example:Mail")
   :properties `((:sender :string ,(s-prefix "example:sender"))
                 (:subject :string ,(s-prefix "example:subject"))
                 (:content :string ,(s-prefix "example:content"))
                 (:ready :string ,(s-prefix "example:ready")))
   :resource-base (s-url "http://example.com/mails/")
   :on-path "mails")
This will create a resource description that we can manipulate on route /mails with the properties sender, title, body and ready.
Then add the prefix to the repository.lisp file:
(add-prefix "example" "http://example.com/")We are almost there for a first test! The only thing left to do is to add the /mails route to the dispatcher (for more info check the documentation on http://mu.semte.ch). To do this add the following block of code to the dispatcher.ex file:
match "/mails/*path" do
  Proxy.forward conn, path, "http://resource/mails/"
end
Now fire this up and lets see what we have by running the following command in the project root directory:
docker-compose upNote: We don’t have a front-end, but with a tool like postman we can make GET, PATCH and POST calls to test the backend functionality.
A GET call to http://localhost/mails produces:
{
  "data": [],
  "links": {
    "last": "/mails/",
    "first": "/mails/"
  }
}
Alright! Ok, no data yet, but we get back resource information.
Lets do a post request to make a new mail resource:
URL: http://localhost/mails
Headers: {"Content-Type":"application/vnd.api+json"}
Body:
  {
    "data":{
      "attributes":{
        "sender":"flowofcontrol@gmail.com",
        "subject":"Mu Semtech Mail Server",
        "content":"This is a test for the Mu Semtech Mail Server.",
        "ready":"no"
      },
      "type":"mails"
    }
  }
This gives us the following reponse:
{
  "data": {
    "attributes": {
      "sender": "flowofcontrol@gmail.com",
      "subject": "Mu Semtech Mail Server",
      "content": "This is a test for the Mu Semtech Mail Server.",
      "ready": "no"
    },
    "id": "58978C2A6460170009000001",
    "type": "mails",
    "relationships": {}
  }
}
That worked! In about 30 minutes we have a fully functional REST API endpoint for managing mail resources!
To verify the original get request again, this now produces:
{
  "data": {
    "attributes": {
      "sender": "flowofcontrol@gmail.com",
      "subject": "Mu Semtech Mail Server",
      "content": "This is a test for the Mu Semtech Mail Server.",
      "ready": "no"
    },
    "id": "58978C3A6460170009000002",
    "type": "mails",
    "relationships": {}
   }
}Before we can start writing our reactive mail managing micro-service, we will need to add a monitoring service to monitor the DB. This will be a lot easier than it sounds with mu.semte.ch. To start, open the docker-compose.yml file and add the following lines at the bottom of the file:
# ...
delta:
  image: semtech/mu-delta-service:beta-0.7
  links:
    - db:db
  volumes:
    - ./config/delta-service:/config
  environment:
    CONFIGFILE: "/config/config.properties"
    SUBSCRIBERSFILE: "/config/subscribers.json"
This will add the monitoring service to our installation. The last thing to do for now is to change the link on the resource microservice by replacing
links:
  - db:database
with
links:
  - delta:database
The final steps are to create the configuration and subscribers files. Create a file called config.properties at the location config/delta-service/config.properties and write the following lines in that file:
# made by Langens Jonathan
queryURL=http://db:8890/sparql
updateURL=http://db:8890/sparql
sendUpdateInBody=true
calculateEffectives=true
and then create config/delta-service/subscribers.json and put this JSON inside:
{
  "potentials":[
  ],
  "effectives":[
  ]
}
If we run docker-compose rm and then docker-compose up again, the delta service will be booting and already monitoring the changes that happen in the database! Of course we are not doing anything with them yet. So we will create a new micro-service just for this purpose.
The next step is to build our mail handling microservice. To do this we create a new directory called mail-service in our base directory. Then we create a file in that directory called Dockerfile. We will start from a mu.semte.ch template to make developing this microservice that much quicker. Mu.semte.ch has templates for a bunch of languages ruby, javascript, python, … For this microservice we will go for python 2.7. To do this we simply need to create a web.py file which will serve as the location for our code. Next add the following to the Dockerfile:
# mail-service/Dockerfile
FROM semtech/mu-python-template

MAINTAINER Langens Jonathan <flowofcontrol@gmail.com>
I know it doesn’t say much, but it doesn’t need to. The python template will handle the rest.
Then we need to add some mail manipulating functionality. Since this is not really the objective of this post I create a mail_helpers.py file and paste the following code in there:
# mail-service/mail_helpers.py
import sys
import imaplib
import getpass
import email
import datetime
import uuid
import helpers

def save_mail(sender, date, subject, content):
  str_uuid = str(uuid.uuid4())
  insert_query = "INSERT DATA\n{\nGRAPH <http://mu.semte.ch/application>\n{\n<http://mail.com/examples/mail/" + str_uuid + "> a <http://mail.com/Mail>;\n"
  insert_query += "<http://mail.com/from> \"" + sender + "\";\n"
  insert_query += "<http://mail.com/date> \"" + date + "\";\n"
  insert_query += "<http://mail.com/content> \"" + content + "\";\n"
  insert_query += "<http://mail.com/subject> \"" + subject + "\";\n"
  insert_query += "<http://mu.semte.ch/vocabularies/core/uuid> \"" + str_uuid + "\".\n"
  insert_query += "}\n}"
  print "query:\n", insert_query
  helpers.update(insert_query)

def process_mailbox(mailbox):
  rv, data = mailbox.search(None, "ALL")
  if rv != 'OK':
    print "No messages found!"
  return

  for num in data[0].split():
    rv, data = mailbox.fetch(num, '(RFC822)')
    if rv != 'OK':
      print "ERROR getting message", num
    return

    msg = email.message_from_string(data[0][1])
    content = str(msg.get_payload())
    content = content.replace('\n','')

    save_mail(msg['From'], msg['Date'], msg['Subject'], content)
As you can see the mail_helpers contain 2 functions, one to iterate over all emails in a mailbox and the other to save a single email to the triple store. Easy peasy!
Next we create web.py. For more information on how the python template can be used you can visit: https://github.com/mu-semtech/mu-python-template. I created the following method to process all mails:
# mail-service/web.py
@app.route("/fetchMails")
def fetchMailMethod():
  EMAIL_ADDRESS = "address"
  EMAIL_PWD = "pwd"

  MAIL_SERVER = imaplib.IMAP4_SSL('imap.gmail.com')

  try:
    MAIL_SERVER.login(EMAIL_ADDRESS, EMAIL_PWD)
    except imaplib.IMAP4.error:
     print "Logging into mailbox failed! "

  rv, data = MAIL_SERVER.select("INBOX")
  if rv == 'OK':
    mail_helpers.process_mailbox(MAIL_SERVER)
    MAIL_SERVER.close()

  MAIL_SERVER.logout()

  return "ok"
This method is rather straightforward: it just opens a connection to an email address and opens the inbox mailbox. It then selects it for processing, thus inserting all mails into the triple store.
At this point, we have:
- Defined a JSONAPI through which we can access our emails, using the standard mu.semte.ch stack
- Built a custom service which fetches the emails from our mail account and inserts them into the triplestore using the right model
Now we will use these services in combination with the delta service, to discover which emails were inserted into the database, and to perform reactive computations on it.
The delta service’s responsibilities are:
- Acting as the SPARQL endpoint for the microservices
- Calculating the differences (deltas) that a query will introduce in the database
- Notifying interested parties of these differences
For this hands on we use version beta-0.8 of the delta service.
There are 2 types of delta reports, you have potential inserts and effective inserts. A report for either will look like:
{
  "delta": [
    {
      "type": "effective",
      "graph": "http://mu.semte.ch/application",
      "inserts": [
        {
          "s": {
            "value": "http://example.com/mails/58B187FA6AA88E0009000001",
            "type": "uri"
          },
          "p": {
            "value": "http://example.com/subject",
            "type": "uri"
          },
          "o": {
            "value": "Mu Semtech Mail Server",
            "type": "literal"
          }
        },
       ...
}
You can view the full version here.
A report states the query that was send, an array of inserted objects and an array of deleted objects: Inserted or deleted objects represent a single triple with s, p and o being subject, predicate and object.
We need to notify the delta service of the existence of our mail handling service. We do this using the subscribers.json file that was created before. Change it so it looks like:
{
  "potentials":[
  ],
    "effectives":[
    "http://mailservice/process_delta"
  ]
}
In the docker-compose.yml file we need to alter the delta-service definition to look like:
  delta:
    image: semtech/mu-delta-service:beta-0.8
    links:
      - db:db
      - mailservice:mailservice
    volumes:
      - ./config/delta-service:/config
    environment:
      CONFIGFILE: "/config/config.properties"
      SUBSCRIBERSFILE: "/config/subscribers.json"
That way the delta service can talk to the mailservice.
To handle delta reports in our mail handling microservice we will need 2 things:
- Get access to the POST body of a request
- Process and manipulate JSON data
To get access to this add the following imports to your web.py file:
import json
from flask import request
Then we define a new method that will:
- Handle the incoming delta reports
- Load the delta report into a variable
- Define some variables.
Lastly we define an array that will hold the URI’s of all emails that need to be send.
# mail-service/web.py
@app.route("/process_delta", methods=['POST'])
def processDelta():
  delta_report = json.loads(request.data)
  mails_to_send = set()
  predicate_mail_is_ready = "http://example.com/ready"
  value_mail_is_ready = "yes"
  # continued later...
We will loop over all inserted triples to check for mails that are ready to be send:
# mail-service/web.py
def processDelta():
  # ...
  # ...continuation
  for delta in delta_report['delta']:
      for triple in delta['inserts']:
          if(triple['p']['value'] == predicate_mail_is_ready):
              if(triple['o']['value'] == value_mail_is_ready):
                  mails_to_send.add(triple['s']['value'])
  # continued later...
After this for loop has run, all the URI’s of mails that are ready to be send will be in the mails_to_send array. Now we loop over the array and query the database for each URI in the set. And then we will fetch a mail object for every URI that is in the set.
Add the following code to mail_helpers.py:
# mail-service/mail_helpers.py
def load_mail(uri):
    # this query will find the mail (if it exists)
    select_query = "SELECT DISTINCT ?uuid ?from ?ready ?subject ?content\n"
    select_query += "WHERE \n{\n"
    select_query += "<" + str(uri) + "> <http://mail.com/from> ?from;\n"
    select_query += "a <http://mail.com/Mail>;\n"
    select_query += "<http://mail.com/content> ?content;\n"
    select_query += "<http://mail.com/subject> ?subject;\n"
    select_query += "<http://mail.com/ready> ?ready;\n"
    select_query += "<http://mu.semte.ch/vocabularies/core/uuid> ?uuid.\n"
    select_query += "}"

    # execute the query...
    result = helpers.query(select_query)

    # if the length of the result array is 0 we return nil
    if len(result['results']['bindings']) < 1:
        return {}

    # I should probably check here but for a quick test application
    # it doesn't matter that much. If there is more than 1 result
    # that would indicate a data error
    bindings = result['results']['bindings'][0]

    # we extract an object
    mail = dict()
    mail['uuid'] = bindings['uuid']['value']
    mail['sender'] = bindings['from']['value']
    mail['ready'] = bindings['ready']['value']
    mail['subject'] = bindings['subject']['value']
    mail['content'] = bindings['content']['value']

    return mail
This function will load the mail object from the triple store. There is still the chance that the ready predicate was sent for some other object, for a mail that does not have all required fields, or for an object that is not a mail but happens to use the same predicate.
We will use this function to try to load a mail object for each URI. Because the query was built without OPTIONAL statements, we are certain that an the dictionary returned by the load_mail function will either have all keys or none.
To send the mail I have copied the entire send_mail function from http://naelshiab.com/tutorial-send-email-python/ and modified it slightly to take into account the dictionary object that now describes the mail.
# mail-service/mail_helpers.py
def send_mail(mail):

    fromaddr = "YOUR EMAIL"
    toaddr = "EMAIL ADDRESS YOU SEND TO"

    msg = MIMEMultipart()

    msg['From'] = mail['from']
    msg['To'] = mail['to']
    msg['Subject'] = mail['subject']

    body = mail['content']
    msg.attach(MIMEText(body, 'plain'))

    server = smtplib.SMTP('smtp.gmail.com', 587)
    server.starttls()
    server.login(fromaddr, "YOUR PASSWORD")
    text = msg.as_string()
    server.sendmail(fromaddr, toaddr, text)
    server.quit()
The last thing that we need to do is to connect the list of URI’s to the send_mail function:
# mail-service/web.py
def processDelta():
  # ...continuation
    for uri in mails_to_send:
        mail = mail_helpers.load_mail(uri)
        if 'uuid' in mail.keys():
            mail_helpers.send_mail(mail, EMAIL_ADDRESS, EMAIL_PWD)
To test this you can send a POST request similar to this one to your local mu.semte.ch application on http://localhost/mails:
{"data":{
  "attributes":{
    "from":"flowofcontrol@gmail.com",
    "subject":"A mail from the triple store",
    "content":"This mail was sent by a micro service that listens to your triple store.",
    "ready":"yes",
    "to":"flowofcontrol@gmail.com"
    },
 "type":"mails"
 }
}
If all went well then the person whose email address you filled in in the to field will have gotten a mail from you. Good job! You've just created a mailing microservice.
This tutorial has been adapted from Jonathan Langens' mu.semte.ch articles. You can view them here and here.

In a nutshell, Ember FastBoot introduces server side rendering on your ember app, which should not only improve user experience by serving static content first, but also make your website more SEO friendly. For more info, I would recommend you to check out https://ember-fastboot.com/.
All right, let’s get started. Assume you’re writing the new blogging app, called “mu-fastboot-example”.
It has a very simple data model with two entities. A blog post, which has a title, content, an author and many comments. You can find the definition here. The backend needs a frontend of course and this has been published here.
Assume for now, we only need an index page, which displays an overview of the current posts along with the number of comments to this post, and the authors of the comments. A blog-post-summary component was created and its template may be found here.
Firing up both frontend and backend, your home page would look like this.
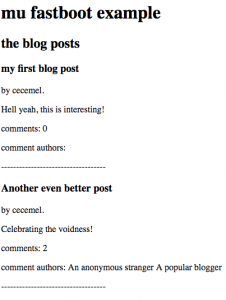
Fetching your index page with a JavaScript disabled client, like e.g. curl, results in a totally SEO unfriendly, user unfriendly blank page, which waits till all resources are loaded before showing something.
As https://ember-fastboot.com/docs/user-guide#architecture will tell you, two components are involved: the ember addon fastboot, and the application server itself, which will pre-prender your app.
Installing fast boot add on is as simple as typing:
ember install ember-cli-fastbootThe nice thing is, locally, you can immediately test the result of adding fastboot. Type
ember fastbootAnd to see the result (on port 3000):
curl localhost:3000 There is still an issue. As you might have noticed, the second blog post doesn’t contain any comments or any comment authors.
This because, FastBoot decides returning the page to the client, once the model() hook resolves (or beforeModel(), afterModel()).
If there is a component making an asynchronous call, e.g. counting the comments for each post, FastBook won’t consider this .
The trick is, to make sure these async calls are resolved before, the model() hook is resolved. You could change app/routes/index.js e.g. to the following:
    import Ember from 'ember';

    export default Ember.Route.extend({
        fastboot: Ember.inject.service(),
        model() {
            if (this.get('fastboot.isFastBoot')) {
                return this.store.findAll('blog-post', {include: "comments"});
            }
            return this.store.findAll('blog-post');
        }
    });
This result of this change, can be seen immediately:
curl localhost:3000Unfortunately, this makes FastBoot a little less transparent then one would have initially hoped for. More information may be found at FastBoot.
FastBoot has some nice deploy possibilities such as with AWS and Heroku, but in our case, we’ll go for the custom server. At the time of writing, the documentation is NOT up to date, and as an app server you should use, fastboot-app-server instead of fastboot.
Just as with normal ember apps, in your app root, you build with
ember buildwhich should, among the normal files, also create a dist/fastboot/ folder.
To host everything, you should follow the instructions described here.
FORTUNATELY, to ease the deploy, a docker image has been created, which can easily be added to your mu-project, like e.g. here .
As usual, firing the project up with
docker-compose stop; docker-compose rm -f; docker-compose up and you should have a working app.
So, that’s it. In case of questions, feel free to reach out.
This tutorial has been adapted from Felix Ruiz De Arcaute's mu.semte.ch article. You can view it here
In this post I want to explore how to add a machine learning microservice to any existing mu.semte.ch project. I want to be able to upload an image and add the labels for that image to the SPARQL store.

TensorFlow’s inception library is great for image classification, it is a deep neural network that is trained to recognize objects. We can remove and retrain the outer layer easily (you can find a tutorial by Google on it). The microservice we will use wraps Inception and offers 3 routes:
- Add-Training-Example: through this route you tell the system that a certain image file is of a certain label
- Train: trains the model
- Classify: takes an image file and adds the classification to the triple store
For an exisiting mu.semte.ch project you will probably want to add this microservice together with a trained graph and the use the classify route. While it is possible for a production system to learn, this may not be the best idea. Computers love to train, so they allocate all their computational resources to that, rather than keeping the rest smoothly running.
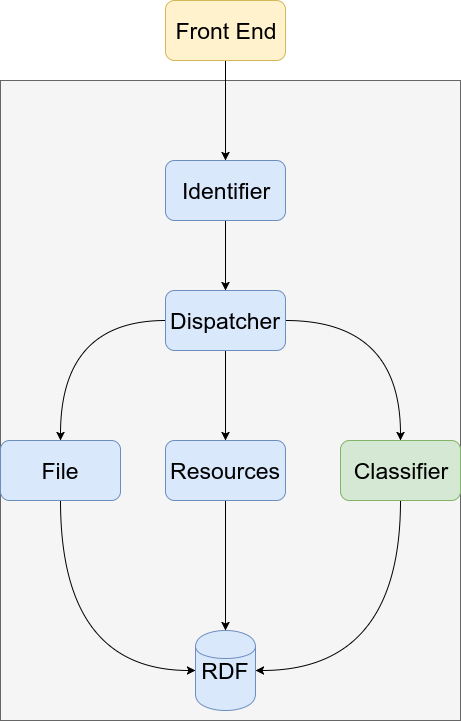
I have prepared a small example project where you can see and test the classifier microservice. After you clone this it has no trained graph so the classify route will not work. The architecture of this demo app is as in the image below:
So you have cloned the repository, cd in to the directory and type:
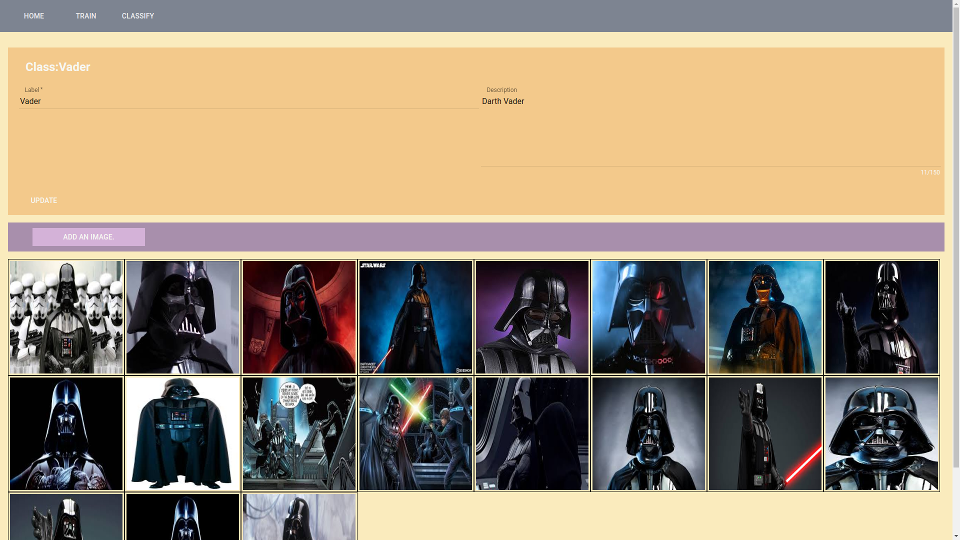
docker-compose upOpen a browser and surf to localhost. Click on the training route. To train the model you have to add classes (min 2) and then add images for those classes. Be sure not to use any other image format than JPG. After you have prepared the training set you can click the “Train” button. Your computer will be busy for a while now. If you need a more detailed tutorial on how to train there is one on the main page of the project you have just cloned, check the ‘/’ route!
After you have a trained graph it is really as simple as adding the image classifier microservice to your mu.semte.ch project and all will work. The assumption is though that the vocabulary that is used to describe the files in your triple store is the one that is documented on the mu-file-service.
Add this snippet to your docker-compose.yml:
classifier:
  image: flowofcontrol/mu-tf-image-classifier
  links:
    - db:database
  environment:
    CLASSIFIER_TRESHHOLD: 0.7
  volumes:
    - ./data/classifier/tf_files:/tf_files
    - ./data/classifier/images:/images
    - ./data/files:/files
  ports:
    - "6006:6006"
As you can see we include 3 folders and expose a port. On that port you can also make use of TensorBoard, which is TensorFlow’s administration board and that gives you access to all kind of statistics about our image classifier. Add this to your dispatcher (if you want to be able to retrain, you also have to add the other routes):
match "/classify/*path" do
Proxy.forward conn, path, "http://classifier:5000/classify/"
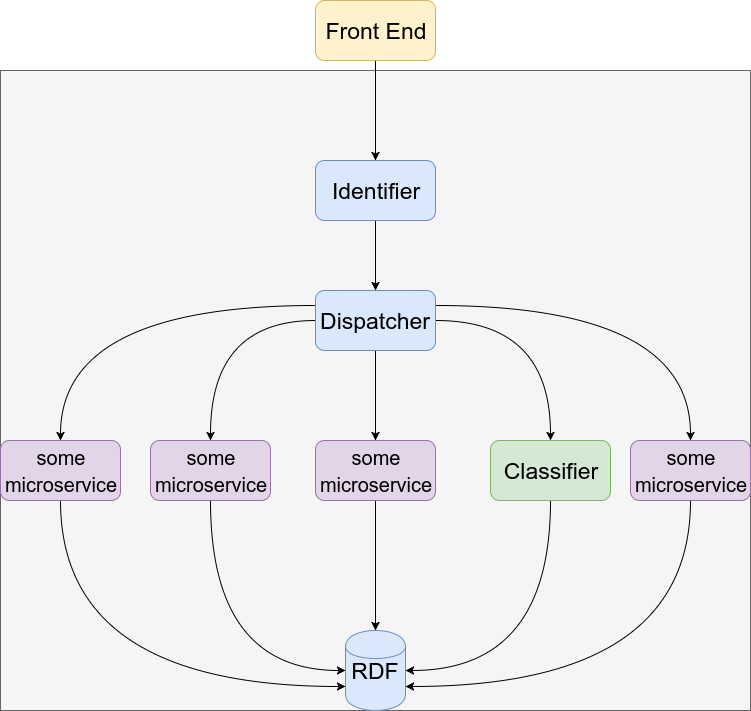
endThe architecture of your app might then look somewhat like:
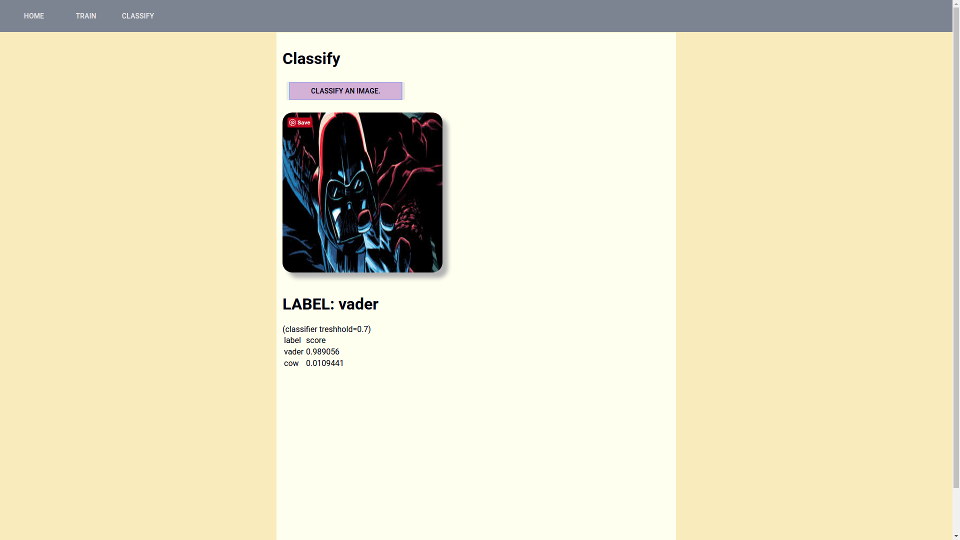
If you then have an image you want to classify with it’s metadata correctly in the triple store then you can call the classify route and your image will be tagged. The response of the classify route will also tell you the probabilities for other labels. Below is what I get when I use the demo app to classify a random “Darth Vader” search result from images.google.com:
That’s all folks!
This tutorial has been adapted from Jonathan Langens' mu.semte.ch article. You can view it here