Raspberry Pi OS Lite Setup
1. Flash the latest Raspberry Pi OS 32-bit Lite image on to an SD card for the Pi Zero W (or other BT capable Pi) (https://www.raspberrypi.org/documentation/installation/installing-images/README.md)
2. Setup Wifi and SSH (https://desertbot.io/blog/headless-raspberry-pi-4-ssh-wifi-setup)
3. Identify your Pi’s IP address
$ ifconfig
- Then connect using an SSH client, such as Putty (https://www.putty.org/)
4. Once connected type the following commands:
$ sudo apt install git
$ git clone https://github.com/jrnelson90/tinderboxpedal
$ cd tinderboxpedal/src
$ ./setupDeps.sh
5. Setup Bluetooth:
- To ensure proper BT pairing, add
DisablePlugins = pnatto/etc/bluetooth/main.confpost dependecy setup (we'll use the CLI text editornanofor this):
$ sudo nano /ect/bluetooth/main.conf
- Use the arrows keys to scroll all the way down to the bottom, and add the following on a new line:
DisablePlugins = pnat
- Then, press
Enterto add one line for the end of file. - Press
Ctrl+Oand thenEnterto save your changes to the file, thenCtrl+Xto exitnano(You should be back at the commend line)
$ hciconfig
- You should see a BT MAC address and
UP RUNNINGfor you BT adapter in your console output

6. Setup I2C
- Enter the Raspberry Pi Config tool using:
$ sudo raspi-config
- The
raspi-configscreen will appear – navigate using the arrow keys and tab) - Select
Interfacing Options–>I2C->Enable I2C


- Exit the
raspi-configscreen (Esc)
7. Power off the Pi and wire up the controls and screen, or if you've already done this, restart and skip to step 9
$ sudo poweroff
$ sudo reboot
8. Connect the wiring as per the schematic, customizing for your button GPIO/layout if you wish via nano tinderbox.py in the same way we did above:

- Now power on, login, and test that our screen is appearing properly:
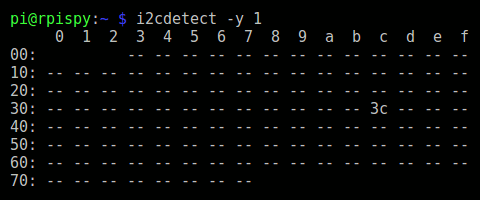
$ i2cdetect -y 1
- If the OLDE screen is connected correctly, the following should appear:
9. Time to run the script!
$ python3 tinderbox.py
The screen should display the startup script and scan for available Bluetooth devices for connection
10. After an inital scan for BT "classic" devices, use the 4 buttons to select the appropriate device for connection from the menu. You will need to know the MAC address of your amp, which you can find in the saved device info of any phone or tablet that you've previously connected with the amp.
The menu input is currently based around a 4-button square layout:
Button 1 = Up       Button 2 = Rescan Bluetooth
Button 3 = Down     Button 4 = Select
11. If no devices are detected, you will be given a yes or no query to rescan. The button mapping for this is:
Button 3 = No Button 4 = Yes
12. If you wish to disconnect from the current device, hold down any two buttons for 5 seconds. If you trigger this by accident, you can release the buttons before the 5 seconds has passed to cancel the disconnect.
13. To stop the script, enter Ctrl+C at any time.