
ManTL is a lightweight & type-safe template engine directly integrated with the Java compiler using Manifold. It supports the full Java language, type-safe arguments to templates, type-safe inclusion of other templates, shared layouts for templates and custom base classes for application-specific logic, among other features.
Templates compile directly in your build as if Java source files without a separate code generation build step, therefore your Java source code can reference and use your template files by name directly as Java classes. This level of integration and type-safety promotes higher levels of integrity and performance. It also enables tooling like the Manifold IntelliJ plugin to provide deterministic code completion, navigation, usage searching, and refactoring. Additionally the IntelliJ plugin enables incremental compilation and hot swap debugging, allowing you to make template changes in a running application.
Clone the Manifold sample Web App project to quickly begin experimenting with ManTL templates using the Manifold IntelliJ plugin.
- Usage
- Syntax
- Whitespace
- Javalin Support
- Provided Manifold Features
- IDE Support
- Setup
- Javadoc
- License
- Versioning
- Author
After incorporating the manifold-templates dependency in your build (see the Building section), you can
begin using ManTL by placing a new file with the mtl extension in your resources directory (nb: not in your source
directory). The file can have any sort of string content, as well as dynamic content and directives
that change how the template behaves.
Note it is helpful, but not required, to include the file extension of the target content in the template file name. For instance, a template that produces HTML as output is named MyTemplate.html.mtl
Consider the following template named HelloWorld.txt.mtl, located in the resources/templates directory:
Hello World!This template can be used directly from your Java code:
import templates.HelloWorld;
public class Demo {
  public static void main(String[] args) {
    System.out.println(HelloWorld.render());
  }
}
This prints Hello World to your console.
If you want to add a parameter to the template, you can change the template to use the params directive:
<%@ params(String name) %>
Hello ${name}!
Note you can make changes to your templates in IntelliJ while debugging your application. The Manifold plugin for IntelliJ hot swaps incremental compilation changes into your running application.
You can call this parameterized template with a String argument:
import templates.HelloWorld;
public class Demo {
  public static void main(String[] args) {
    System.out.println(HelloWorld.render("ManTL"));
  }
}
Which prints Hello ManTL! to your console.
If you do not wish to materialize the template as a string, you can use the renderInto() method to render templates
into any Appendable object. The renderInto() method is similar to render() but defines an additional Appendable
parameter and returns void.
As with most template languages, a ManTL template consists of regular textual content interspersed with language constructs such as statements, expressions, comments, and directives.
ManTL lets you control output of a template with Java language statements. You inline statements or statement fragments in a template using this syntax:
<% java-statement-parts %>ManTL supports all Java language statements including variable and method declarations and control structures. For
example, the if statement:
<% if(total >= 90) { %>
Grade: A
<% } %>
results in the following output if total is 90 or greater:
Grade: A
otherwise, the statement has no effect on the output.
Notice the statement is fragmented between two sets of <% %> delimiters. You can leverage many of Java's
statements in this way to control the output, including if-else, switch, for, while, and do-while.
This example demonstrates how a simple for statement can repeat a section of the template's content:
<% for(String brand: Arrays.asList("Maserati", "Alfa Romeo", "Abarth") { %>
  Fiat brand: ${brand}
<% } %>
Renders as:
  Fiat brand: Maserati
  Fiat brand: Alfa Romeo
  Fiat brand: Abarth
You can achieve the same result using a Java lambda expression:
<% Arrays.asList("Maserati", "Alfa Romeo", "Abarth").forEach(brand -> { %>
  Fiat brand: ${brand}
<% }); %>A ManTL expression contains a Java language expression, it is evaluated, coerced to a String, and
inserted where the expression appears in the ManTL file.
Use expressions with this syntax:
<%= java-expression %>Additionally, the following shorthand syntax is also valid:
${ java-expression }For example, this template:
<html>
  <head><title>Expression Example</title></head>
  <body>
    <% int y = 10; %>
    <p style="font-size: ${y}"> The font size of this paragraph is ${y}. </p>
  </body>
</html>
generates the following HTML:
<html>
  <head><title>Expression Example</title></head>
  <body>
    <p style="font-size: 10"> The font size of this paragraph is 10. </p>
  </body>
</html>
Note the statement declaring the y variable does not directly contribute to the resulting content. This is because a
statement does not produce a value to display, instead a statement controls what displays. By contrast an expression
produces a value, thus it directly renders as part of the template's resulting content, hence both ${y} expressions
render 10 in the output.
Comments are blocks that delimit areas of the template the compiler ignores; they do not contribute to the template's output. Use them to make comments and to temporarily mask off sections of a template as you like.
Note template comments in no way affect the generated Java code, they are exclusively template file comments.
The syntax of a comment is as follows:
<%-- This is a comment --%>Directives are commands you use to control the compilation and resulting structure of a template.
Directives have the following syntax:
<%@ directive-name [options] %>Here is a summary of all the ManTL directives. More detailed descriptions follow.
| Directive | Syntax | Description |
|---|---|---|
| import | <%@ import type-name %> |
Imports Java types for use in template directives, statements, and expressions |
| extends | <%@ extends class-name %> |
Extends a base class having features suitable for the template file |
| params | <%@ params(parameter-list) %> |
Parameters for the template, arguments passed via the render(arg-list)method |
| include | <%@ include template-name[(parameter-list)] [if <condition>]%> |
Include a separate template in the template |
| nest | <%@ nest template-name[(parameter-list)] [if <condition>]%> |
Nest a separate template in the template |
| section | <%@ section section-name(parameter-list) %> |
Creates a sub-template within the template, that can be called from other templates |
| layout | <%@ layout template-name %> |
Specifies the template in which the declaring template nests its content |
| content | <%@ content %> |
Used in a layout template, denotes where the content of a nested template renders |
Use the import directive as you would a Java import statement so you can use Java classes without
having to qualify them with package names.
The syntax of the import directive:
<%@ import type-name %>This example imports the java.util.HashSet class and uses it to declare the myHashSet variable:
<html>
<%@ import java.util.HashSet %>
  <head><title>Import Example</title></head>
  <body>
    <% int y = 10;
       HashSet<Integer> myHashSet = new HashSet<>();
       myHashSet.add(y);
       myHashSet.add(15);
       for(Integer a: myHashSet) { %>
         <p> myHashSet contains ${a}. </p>
       <% } %>
  </body>
</html>
The above template produces the following HTML:
<html>
  <head><title>Import Example</title></head>
  <body>
    <p> myHashSet contains 10. </p>
    <p> myHashSet contains 15. </p>
  </body>
</html>
Note
importdirectives must precede all other directives in your template.
Use the extends directive to make a template extend a custom base class, which you can use to provide
additional application specific functionality e.g., Request and Response objects in a web application.
A practical example of the extends directive:
package demo;

import model.Contact;
import manifold.templates.rt.runtime.BaseTemplate;

public abstract class ExampleTemplate extends BaseTemplate {

  public String displayContact(Contact c) {
    if(c.hasName()) {
      return c.getName();
    } else {
      return c.getEmail();
    }
  }

}
This allows the developer to render a clean template:
<%@ import model.Contact %>
<%@ extends demo.ExampleTemplate %>
<%@ params(Contact c)%>

<div>
  <div>
    Contact
  </div>
  <div>
    ${displayContact(c)}
  </div>
</div>
And easily callable:
get("/contact/:id", (req, resp) -> ShowContact.render(Contact.find(req.getParam("id")));Note, all custom base classes must be declared
abstract.
Use the params directive to declare parameters in a template, similar to declaring parameters for a method.
The syntax of the params directive is as follows:
<%@ params(parameter-list) %>For example, you can create the template NameDisplay.html.mtl as the following:
<%@ params(String name) %>
<p>Your name is: ${myName}</p>
You can then include it in another template as follows:
<html>
  <head><title>PARAMS Example</title></head>
  <body>
    <%@ include NameDisplay("Bob") %>
    <%@ include NameDisplay("Scott") %>
  </body>
</html>
Then, the following HTML will be generated:
<html>
  <head><title>PARAMS Example</title></head>
  <body>
    <p>Your name is: Bob </p>
    <p>Your name is: Scott </p>
  </body>
</html>The include directive allows users to insert other templates inside of the given template in a type
safe manner.
The syntax looks like this:
<%@ include [template-name] %>For example, consider the following template, MyTemplate.html.mtl:
<% int fontSize = 0; %>
<html>
  <head><title>WHILE LOOP Example</title></head>
  <body>
    <% while (fontSize <= 3) { %>
      <font color = "green" size = "<%= fontSize %>">
        ManTL Tutorial
      </font><br />
      <%fontSize++;%>
    <%}%>
  </body>
</html>
We can then include it from another template as such:
<%@ include MyTemplate %>Both statements will result in the following HTML code:
<html>
  <head><title>WHILE LOOP Example</title></head>
  <body>
    <font color = "green" size = "0">
      ManTL Tutorial
    </font><
    <font color = "green" size = "1">
      ManTL Tutorial
    </font><br />
    <font color = "green" size = "2">
      ManTL Tutorial
    </font><br />
    <font color = "green" size = "3">
      ManTL Tutorial
    </font><br />
  </body>
</html>ManTL supports shorthand for conditional inclusion of templates. The following syntax:
<% if (condition) { %>
  <%@ include MyTemplate %>
<% } %>
Can be condensed to the following:
<%@ include MyTemplate if(condition) %>The nest directive behaves like include but retains and distributes the indentation whitespace immediately preceding
and following the nest directive. The indentation is applied to each line in the resulting nested template or section.
This behavior facilitates code generation and other use-cases where indentation is significant.
For example, consider the following template MyNesting.txt.mtl:
abc
  <%@ nest Inner%>
def
which nests the template Inner.txt.mtl:
some
code
Rendering MyNesting.txt.mtl results in:
abc
  some
  code
def
ManTL supports shorthand for conditional nesting of templates. The following syntax:
<% if (condition) { %>
  <%@ nest MyTemplate %>
<% } %>
Can be condensed to the following:
<%@ nest MyTemplate if(condition) %>The section directive creates a subsection of the current template that can be added using the include and nest
directives in other templates.
The syntax of a section block:
<%@ section section-name[(symbols-used-in-section)] %>
  SECTION CONTENT HERE
<%@ end section %>
Note the corresponding <%@ end section %> directive must be used to complete the section, otherwise
a compile error results.
For example, you can create the template NestedImport.html.mtl as the following:
<%@ import java.util.* %>
<h1>Defines a section</h1>
<%@ section mySection %>
  <% HashSet<Integer> myHashSet = new HashSet<>();
  myHashSet.add(1);
  myHashSet.add(2);
  myHashSet.add(3);
  for(Integer a: myHashSet) { %>
  <h2 style="font-size: ${a}">Font size: ${a}</h2>
  <% } %>
<%@ end section %>
<p> The End </p>
The above code will generate the following HTML:
  <h1>Defines a section</h1>
  <h2 style="font-size: 1">Font size: 1</h2>
  <h2 style="font-size: 2">Font size: 2</h2>
  <h2 style="font-size: 3">Font size: 3</h2>
  <p> The End </p>
Then, you can include mySection in a separate template:
<%@ include NestedImport.mySection %>Which will result in the following HTML:
  <h2 style="font-size: 1">Font size: 1</h2>
  <h2 style="font-size: 2">Font size: 2</h2>
<h2 style="font-size: 3">Font size: 3</h2>Layouts can be made and used with the content and layout directives respectively.
The content directive splits the current template into the header and footer of a layout.
The layout directive makes the header and footer of the layout frame the current template.
The current template renders at the location of the content directive.
Both the content directive and layout directive are only valid in the outermost class
(not within sections) and can only appear once in a template.
The params directive is not yet supported for a template that contains the content directive.
The syntax of a layout template is as follows:
HEADER CONTENT HERE
<%@ content %>
FOOTER CONTENT HERE
For example, you can create the template LayoutEx.html.mtl:
</html>
  </body>
    <%@ content %>
  </body>
</html>
And use the layout in the following template:
<%@ layout LayoutEx %>
<h1>This is a template that uses a layout.</h1>
<h2>The layout directive can appear anywhere in the template.</h2>
The above code will generate the following HTML:
</html>
  </body>
    <h1>This is a template that uses a layout.</h1>
    <h2>The directive can appear anywhere in the template.</h2>
  </body>
</html>ManTL also supports the ability to set default layouts for templates in a given package via the
ManifoldTemplates.java configuration class:
  // Sets default template for all templates
  ManifoldTemplates.setDefaultLayout(MyLayout.asLayout());

  // Sets default templates for all templates in "some.package"
  ManifoldTemplates.setDefaultLayout("some.package", AnotherLayout.asLayout());
By default, more specific layout declarations take precedence over less specific ones. For example, templates with a
declared layout (using the layout directive) override the default layout.
Note the generated asLayout() static method on layout template classes. This is useful when you override
layouts, as specified below.
Sometimes you may want to manually override the layout of a given template in code,
or render a template with no layout. ManTL classes include two fluent helper methods:
withoutLayout() and withLayout(ILayout) to assist in these cases:
  // Renders the template with no layout, regardless of the configuration
  MyTemplate.withoutLayout().render();

  // Renders MyTemplate with the MyLayout layout, regardless of other configuration
MyTemplate.withLayout(MyLayout.asLayout()).render(); With the exception of the nest directive ManTL language constructs are silent with respect to the template's output.
That is to say, contiguous whitespace characters leading and trailing a language construct are omitted from the
template's generated content. Whitespace characters include spaces, tabs, and new lines.
  <%@ import java.util.ArrayList %>
  <% if(true) { <%>
Hi
  <% } %>
The above template renders just one line of text consisting of the two characters in the word Hi; none of the
whitespace immediately preceding or following the language constructs are included.
Note the
nestdirective retains indentation to support use-cases such as code generation where whitespace is significant.
ManTL is designed with web frameworks like Javalin in mind.
A simple "Hello World!" Javalin application making use of ManTL:
package app;

import manifold.templates.rt.ManifoldTemplates;
import views.Index;
import views.layout.DefaultLayout;

import io.javalin.Javalin;

public class WebApp {
  public static void main(String[] args) {
    // Set up the default layout for the application
    ManifoldTemplates.setDefaultLayout(DefaultLayout.asLayout());

    // Enable tracing
    ManifoldTemplates.trace();

    // Basic Javalin config
    Javalin app = Javalin.create(config -> {
      config.staticFiles.add("/public", Location.CLASSPATH);
      config.http.defaultContentType = "html";
    });

    // Render the Index template
    app.get("/", ctx -> ctx.result(Index.render("Hello World!")));
  }
}
There are two templates in the resources directory: views/Index.html.mtl and views/layouts/DefaultLayout.html.mtl.
Here the code references the Index template directly as a Java class. This is a powerful aspect of ManTL -- the
compiler verifies your links are never broken, and you can fully leverage the strength of IntelliJ for deterministic
code completion, usage searching, refactoring, navigation, incremental compilation, and hot swap.
Note the code takes advantage of the type-safe parameters available in ManTL and no Javalin "TemplateEngine" is needed.
ManTL supports performance tracing with the following syntax:
ManifoldTemplates.trace();After invoking the trace() method, every following render() call prints the following to the console:
- Template template-name rendered in time-to-render ms
A sample Javalin application is available here:
https://github.com/manifold-systems/manifold-sample-web-app
Because ManTL is a Type Manifold you can leverage other aspects of Manifold in your code, including the GraphQL, JSON, and others.
You can create and use Manifold Extensions too. Instead of
writing Util and Helper classes you can write your own extension methods for any Java class. Then use IntelliJ
code completion to improve your development experience with the extended classes.
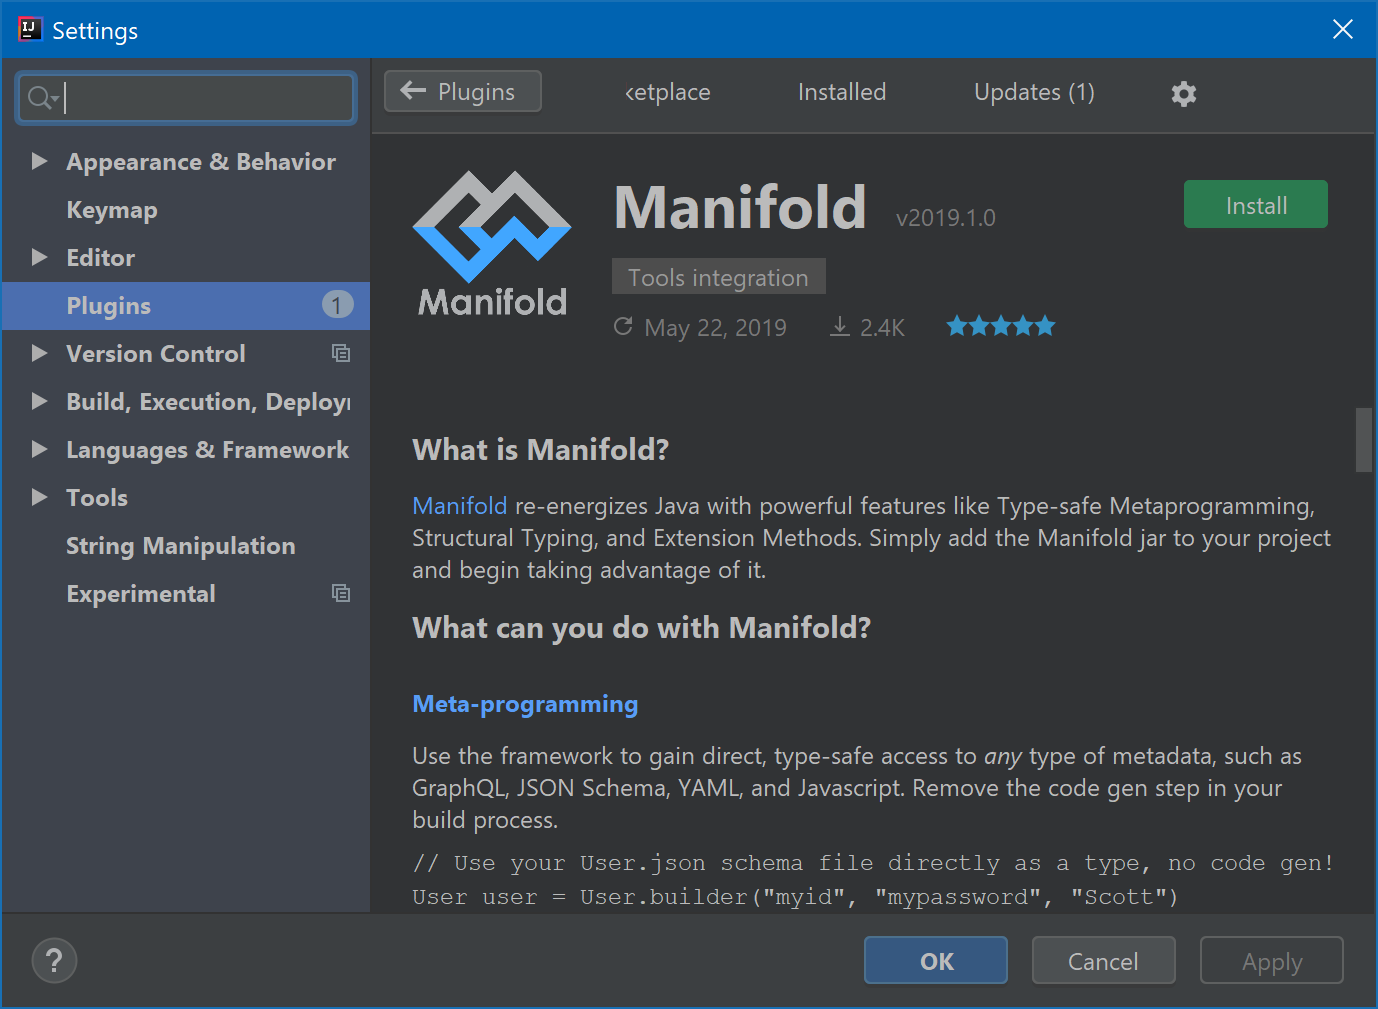
Manifold is fully supported in IntelliJ IDEA and Android Studio.
Get the Manifold plugin directly from within the IDE via:
Settings ➜ Plugins ➜ Marketplace ➜ search: Manifold
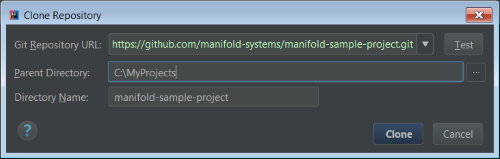
Experiment with the Manifold Sample Project via:
File ➜ New ➜ Project from Version Control ➜ Git
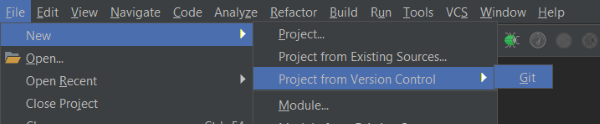
Enter: https://github.com/manifold-systems/manifold-sample-project.git
Use the plugin to really boost your productivity. Every bit of ManTL is supported in the Manifold plugin. Use it to author professional quality templates with the full expressive power of Java in IntelliJ.
The manifold-templates project is defined with Maven. To build it install Maven and run the following command.
mvn compile
The manifold-templates dependency works with all build tooling, including Maven and Gradle. It also works with Java
versions 8 - 21.
This project consists of two modules:
manifold-templatesmanifold-templates-rt
For optimal performance and to work with Android and other JVM languages it is recommended to:
- Add a dependency on
manifold-templates-rt(Gradle: "implementation", Maven: "compile") - Add
manifold-templatesto the annotationProcessor path (Gradle: "annotationProcessor", Maven: "annotationProcessorPaths")
If you are not using Maven or Gradle, you can download the latest binaries here.
Note, if you are targeting Android, please see the Android docs.
Note, if you are using Kotlin, please see the Kotlin docs.
Here is a sample build.gradle script. Change targetCompatibility and sourceCompatibility to your desired Java
version (8 - 21), the script takes care of the rest.
plugins {
    id 'java'
}

group 'systems.manifold'
version '1.0-SNAPSHOT'

targetCompatibility = 11
sourceCompatibility = 11

repositories {
    jcenter()
    maven { url 'https://oss.sonatype.org/content/repositories/snapshots/' }
}

dependencies {
    implementation 'systems.manifold:manifold-templates-rt:2024.1.34'
    testImplementation 'junit:junit:4.12'
    // Add manifold to -processorpath for javac
    annotationProcessor 'systems.manifold:manifold-templates:2024.1.34'
    testAnnotationProcessor 'systems.manifold:manifold-templates:2024.1.34'
}

if (JavaVersion.current() != JavaVersion.VERSION_1_8 &&
    sourceSets.main.allJava.files.any {it.name == "module-info.java"}) {
    tasks.withType(JavaCompile) {
        // if you DO define a module-info.java file:
        options.compilerArgs += ['-Xplugin:Manifold', '--module-path', it.classpath.asPath]
    }
} else {
    tasks.withType(JavaCompile) {
        // If you DO NOT define a module-info.java file:
        options.compilerArgs += ['-Xplugin:Manifold']
    }
}
Use with accompanying settings.gradle file:
rootProject.name = 'MyProject'<?xml version="1.0" encoding="UTF-8"?>
<project xmlns="http://maven.apache.org/POM/4.0.0" xmlns:xsi="http://www.w3.org/2001/XMLSchema-instance" xsi:schemaLocation="http://maven.apache.org/POM/4.0.0 http://maven.apache.org/maven-v4_0_0.xsd">
<modelVersion>4.0.0</modelVersion>
<groupId>com.example</groupId>
<artifactId>my-templates-app</artifactId>
<version>0.1-SNAPSHOT</version>
<name>My Templates App</name>
<properties>
<!-- set latest manifold version here -->
<manifold.version>2024.1.34</manifold.version>
</properties>
<dependencies>
<dependency>
<groupId>systems.manifold</groupId>
<artifactId>manifold-templates-rt</artifactId>
<version>${manifold.version}</version>
</dependency>
</dependencies>
<!--Add the -Xplugin:Manifold argument for the javac compiler-->
<build>
<plugins>
<plugin>
<groupId>org.apache.maven.plugins</groupId>
<artifactId>maven-compiler-plugin</artifactId>
<version>3.8.0</version>
<configuration>
<source>11</source>
<target>11</target>
<encoding>UTF-8</encoding>
<compilerArgs>
<!-- Configure manifold plugin -->
<arg>-Xplugin:Manifold</arg>
</compilerArgs>
<!-- Add the processor path for the plugin -->
<annotationProcessorPaths>
<path>
<groupId>systems.manifold</groupId>
<artifactId>manifold-templates</artifactId>
<version>${manifold.version}</version>
</path>
</annotationProcessorPaths>
</configuration>
</plugin>
</plugins>
</build>
</project>manifold-templates:

manifold-templates-rt:

Open source Manifold is free and licensed under the Apache 2.0 license.
For the versions available, see the tags on this repository.