#TileView
Update: this repo has been updated to include a demo app,
and the widget code as an Android Studio library module.
All other TileView related repos will be deprecated.
The TileView widget is a subclass of ViewGroup that provides a mechanism to asynchronously display tile-based images, with additional functionality for 2D dragging, flinging, pinch or double-tap to zoom, adding overlaying Views (markers), built-in Hot Spot support, dynamic path drawing, multiple levels of detail, and support for any relative positioning or coordinate system.


###Documentation Javadocs are here. Wiki is here.
###Installation Gradle:
compile 'com.qozix:tileview:1.0.15'
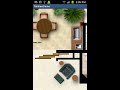
###Demo
A demo application, built in Android Studio, is available in the demo folder of this repository.
Several use-cases are present; the RealMapTileViewActivity is the most substantive.
###Quick Setup
- Tile an image into image slices of a set size, e.g., 256x256 (instructions)
- Name the tiles by the row and column number, e.g., 'tile-2-3.png' for the image tile that would be at the 2nd column from left and 3rd row from top.
- Create a new application with a single activity ('Main').
- Save the image tiles to your
assetsdirectory. - Add
compile 'com.qozix:tileview:1.0.15'to your gradle dependencies. - In the Main Activity, use this for
onCreate:
@Override
protected void onCreate( Bundle savedInstanceState ) {
  super.onCreate( savedInstanceState );
  TileView tileView = new TileView( this );
  tileView.setSize( 2000, 3000 );  // the original size of the untiled image
  tileView.addDetailLevel( 1f, "tile-%col%-%row%.png");
  setContentView( tileView );
}
That's it. You should have a tiled image that only renders the pieces of the image that are within the current viewport, and pans and zooms with gestures.