형지정 배열은 이진 데이터를 다루기 위한 ES6 API 이다.
예제:
const typedArray = new Uint8Array([0,1,2]);
console.log(typedArray.length); // 3
typedArray[0] = 5;
const normalArray = [...typedArray]; // [5,1,2]
// 배열의 요소들은 typedArray.buffer 에 저장 된다.
// 동일한 데이터를 다른 뷰를 통해서도 볼 수 있다.
const dataView = new DataView(typedArray.buffer);
console.log(dataView.getUint8(0)); // 5
Instances of ArrayBuffer store the binary data to be processed. Two kinds of views are used to access the data:
ArrayBuffer 인스턴스는 처리를 위해 이진 데이터를 저장한다. 데이터에 접근할 수 있는 View에는 다음과 같이 2가지가 있다.
- Typed Arrays (
Uint8Array, Int16Array, Float32Array,etc.) interpret the ArrayBuffer as an indexed sequence of elements of a single type. - 형지정 배열(
Uint8Array,Int16Array,Float32Array등등)은 ArrayBuffer 를 싱글 타입의 요소의 인덱스 시퀀스로 번역한다. - Instances of DataView let you access data as elements of several types (
Uint8, Int16, Float32,etc.), at any byte offset inside an ArrayBuffer. - DataView 인스턴스는 ArrayBuffer 안에 있는 어떤 바이트 오프셋에서도 몇몇 타입(
Uint8,Int16,Float32등등)의 요소처럼 데이터에 접근 가능하게 해준다.
The following browser APIs support Typed Arrays (details are mentioned in a dedicated section): 아래의 브라우저 API는 형지정 배열을 지원한다. (자세한 내용은 각 섹션에서 살펴 볼 것.):
- File API
- XMLHttpRequest
- Fetch API
- Canvas
- WebSockets
- 기타 등등
Much data one encounters on the web is text: JSON files, HTML files, CSS files, JavaScript code, etc. For handling such data, JavaScript’s built-in string data type works well. However, until a few years ago, JavaScript was ill-equipped to handle binary data. On 8 February 2011, the Typed Array Specification 1.0 standardized facilities for handling binary data. By now, Typed Arrays are well supported by various engines. With ECMAScript 6, they became part of the core language and gained many methods in the process that were previously only available for Arrays (map(), filter(), etc.).
웹에서 마주치는 많은 데이터(JSON 파일, HTML 파일, CSS 파일, 자바스크립트 코드 등)는 텍스트이다. 이런 데이터를 다루는데 자바스크립트 내장(built-in) 스트링 데이터 타입은 충분히 쓸만하다. 그러나 몇 년 전만 해도 자바스크립트로 이진 데이터를 다루기는 쉽지 않았다. 2011년 8월, 이진 데이터를 위한 형지정 배열 스펙 1.0이 표준화 되었다. 이제는 형지정 배열를 다양 엔진에서 제대로 지원한다. ES6에 이르러 형지정 배열은 언어 중심(core)의 한 부분이 되었고, 이전에는 배열에서만 사용 가능했던 많은 메소드(map(), filter() 등등)도 얻게 되었다.
The main uses cases for Typed Arrays are: 다음은 형지정 배열의 주 사용 예시이다.
- Processing binary data: manipulating image data in HTML Canvas elements, parsing binary files, handling binary network protocols, etc.
- 이진 데이터 처리 : HTML Canvas 요소에 쓰이는 이미지 데이터 조작, 이진 데이터 파싱, 이진 네트워크 프로토콜 처리 등.
- Interacting with native APIs: Native APIs often receive and return data in a binary format, which you could neither store nor manipulate well in traditional JavaScript. That meant that whenever you were communicating with such an API, data had to be converted from JavaScript to binary and back, for every call. Typed Arrays eliminate this bottleneck. One example of communicating with native APIs is WebGL, for which Typed Arrays were initially created. Section “History of Typed Arrays” of the article “Typed Arrays: Binary Data in the Browser” (by Ilmari Heikkinen for HTML5 Rocks) has more information.
- 네이티브 API와의 통신 : 네이티브 API는 종종 이진 포맷으로 데이터를 주고 받는데, 기존의 자바스크립트에서는 이를 저장은 물론 조작도 할 수 없었다. 이는 어떤 API와 통신을 하든 호출 시마다 데이터를 자바스크립트에서 바이너리로, 그리고 그 반대로 변환해야 했다는 의미이다. 형지정 배열은 이런 병목 현상을 없애준다. 네이티브 API 중 WebGL은 형지정 배열이 만들어진 한 이유이다. 더 많은 정보는 “형지정 배열:브라우저에서의 이진 데이터”(Ilmari Heikkinen, HTML5 Rocks)라는 글의 “형지정 배열의 역사” 섹션에서 찾아 볼 수 있다.
Two kinds of objects work together in the Typed Array API: 형지정 배열 API에서는 다음 두 가지 오브젝트가 함께 동작한다.
- Buffers: Instances of
ArrayBufferhold the binary data. - 버퍼(Buffers) : 이진 데이터를 담고 있는
ArrayBuffer의 인스턴스 - Views: provide the methods for accessing the binary data. There are two kinds of views:
- An instance of a Typed Array constructor (
Uint8Array,Float64Array, etc.) works much like a normal Array, but only allows a single type for its elements and doesn’t have holes. - An instance of
DataViewlets you access data at any byte offset in the buffer, and interprets that data as one of several types (Uint8,Float64, etc.).
- An instance of a Typed Array constructor (
- 뷰(Views): 이진 데이터 접근 메소드를 제공한다. 뷰에는 두 가지가 있다.
- 형지정 배열 생성자(
Uint8Array,Float64Array등등)의 인스턴스는 일반 배열과 매우 흡사하게 동작하지만, 오직 한 가지 타입의 요소만 허용하고 빈 요소는 갖지 않는다. DataView버퍼 내 어느 바이트 오프셋에 있는 데이터에도 접근 가능하게 해주고, 몇몇 데이터 타입(Uint8,Float64등)으로 변환해 준다.
- 형지정 배열 생성자(
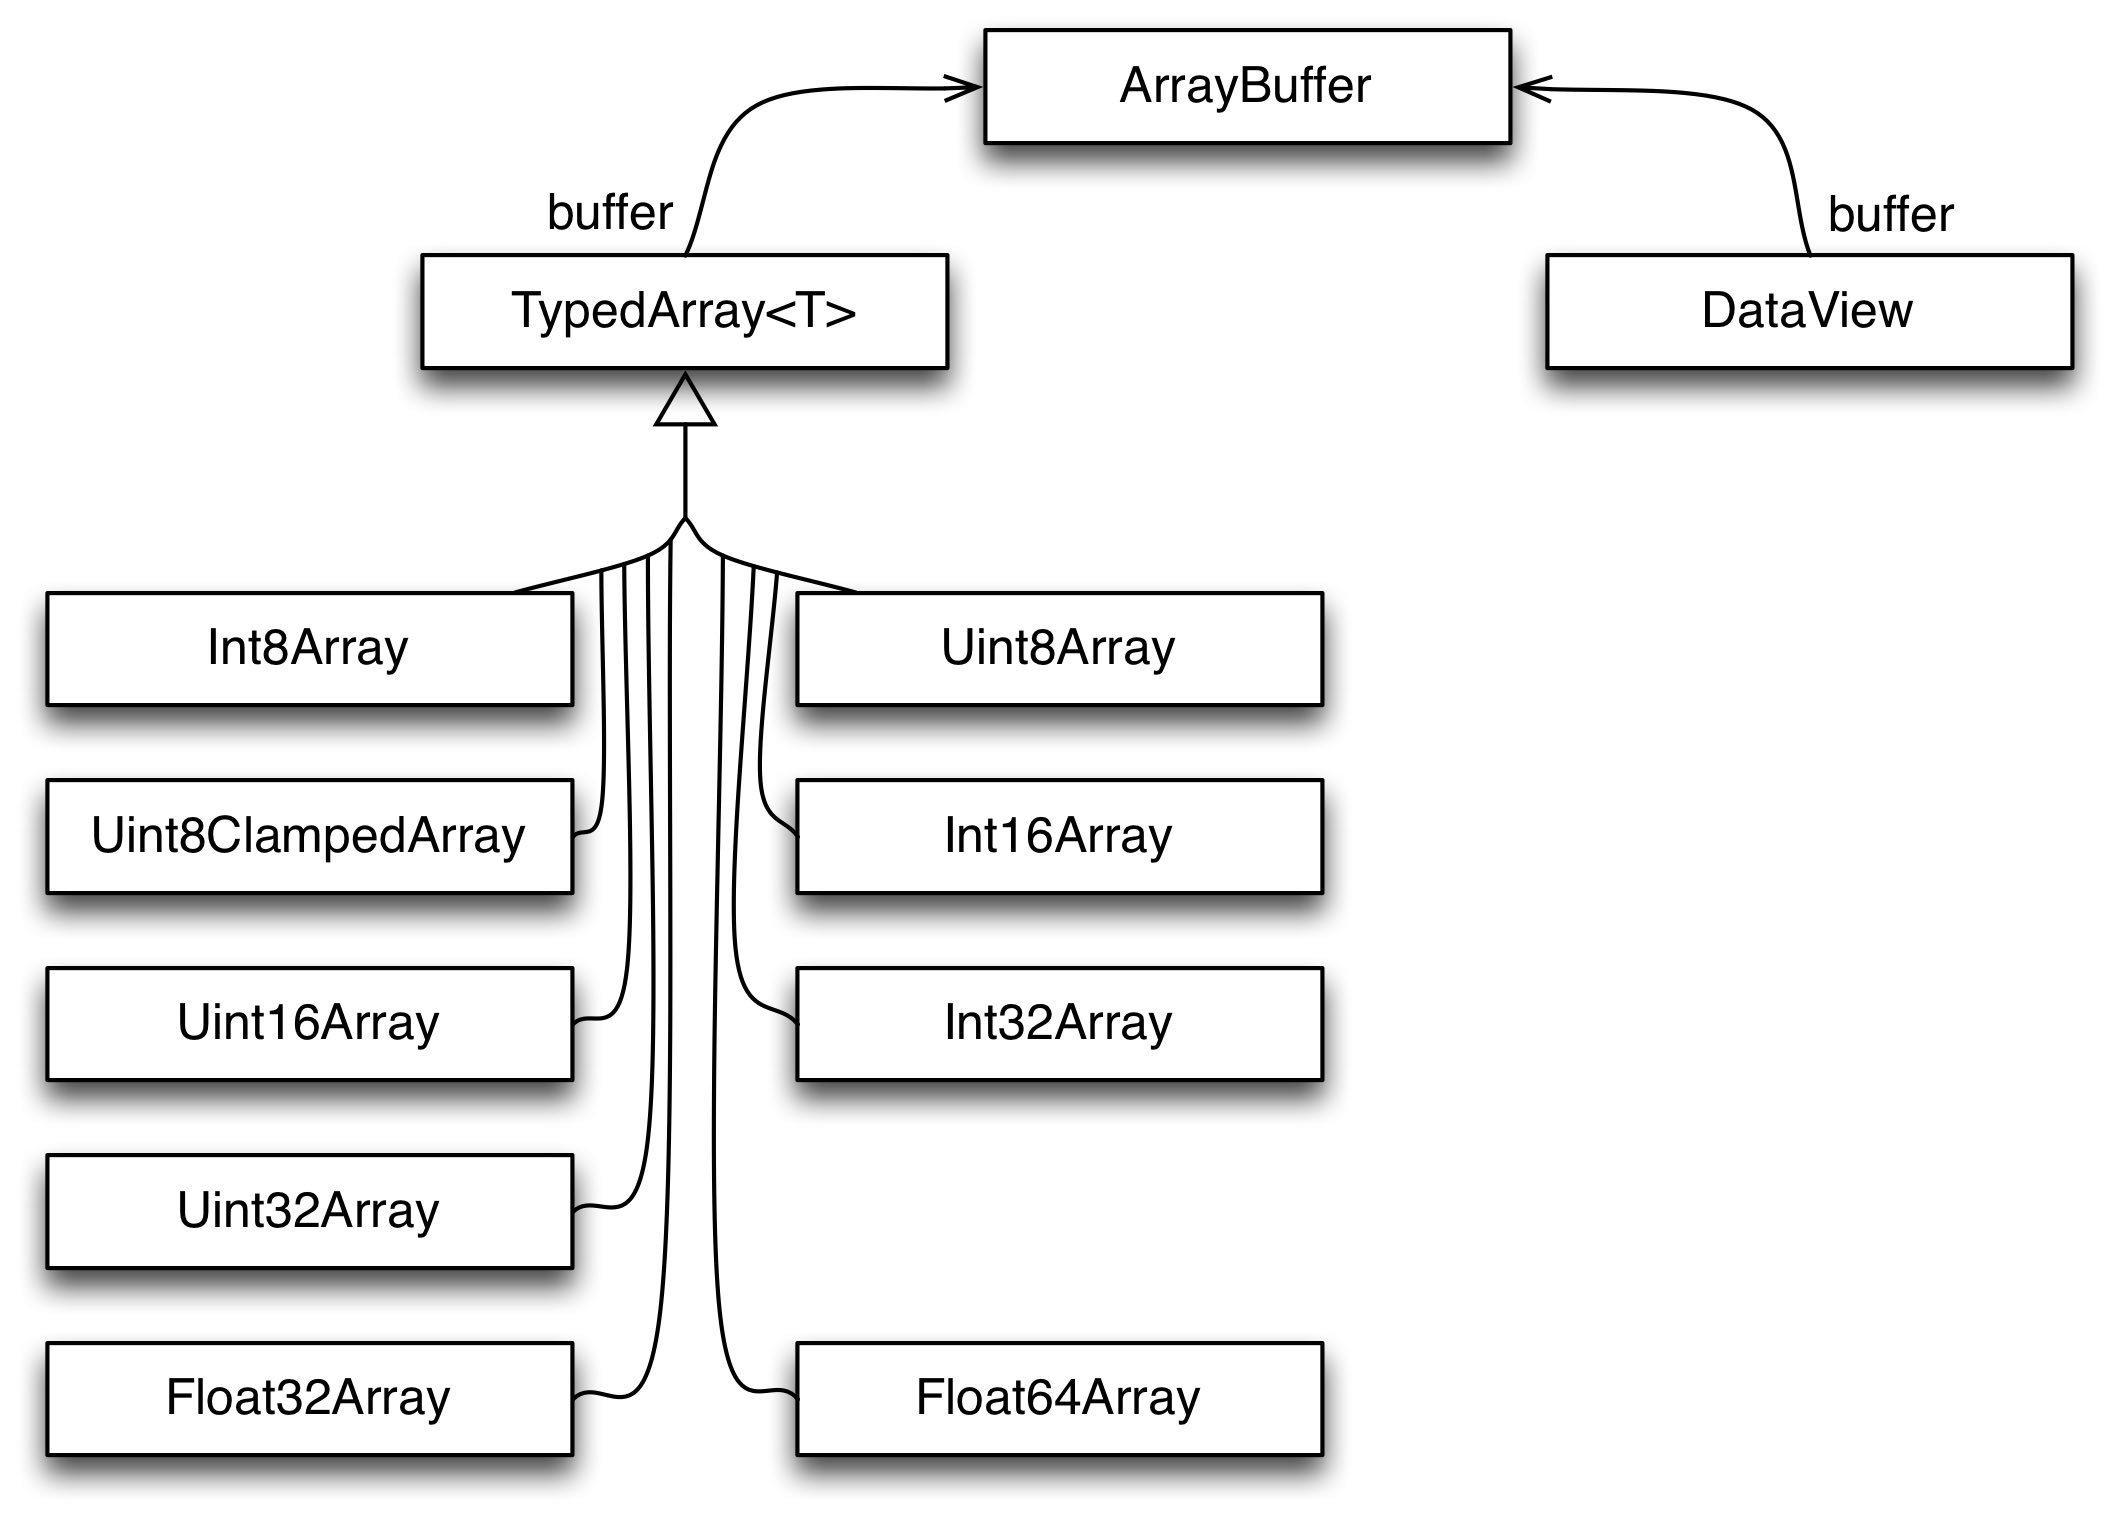
This is a diagram of the structure of the Typed Array API (notable: all Typed Arrays have a common superclass): 다음은 형지정 배열의 API 구조를 그린 다이어그램이다.(주의: 모든 형지정 배열은 공통 superclass 를 갖는다.)
The following element types are supported by the API: 다음의 요소 타입들은 API에서 지원한다.
| 요소타입 | Bytes | Description | C type |
|---|---|---|---|
| Int8 | 1 | 8-bit signed integer | signed char |
| Uint8 | 1 | 8-bit unsigned integer | unsigned char |
| Uint8C | 1 | 8-bit unsigned integer (clamped conversion) | unsigned char |
| Int16 | 2 | 16-bit signed integer | short |
| Uint16 | 2 | 16-bit unsigned integer | unsigned short |
| Int32 | 4 | 32-bit signed integer | int |
| Uint32 | 4 | 32-bit unsigned integer | unsigned int |
| Float32 | 4 | 32-bit floating point | float |
| Float64 | 8 | 64-bit floating point | double |
The element type Uint8C is special: it is not supported by DataView and only exists to enable Uint8ClampedArray. This Typed Array is used by the canvas element (where it replaces CanvasPixelArray). The only difference between Uint8C and Uint8 is how overflow and underflow are handled (as explained in the next section). It is recommended to avoid the former – quoting Brendan Eich:
Uint8C 요소 타입은 특별하다. DataView에서 지원하지 않고, 오로지 Uint8ClampedArray가 활성화 됐을 때 존재한다. 이 형지정 배열은 canvas 요소에서 (CanvasPixelArray를 대체하는데) 쓰인다. Uint8C와 Uint8의 유일한 차이점은 (다음장에서 설명하겠지만) 어떻게 오버플로우와 언더플로우를 다루고 있느냐이다. 앞의 Uint8C는 사용을 피하는 것을 추천한다. – 브랜든 아이크 인용
Just to be super-clear (and I was around when it was born),
Uint8ClampedArrayis totally a historical artifact (of the HTML5 canvas element). Avoid unless you really are doing canvas-y things. 가장 확실한 것은 (만들어질 시점에 함께 했으므로)Uint8ClampedArray은 오로지 (HTML5 canvas 요소의) 역사적 부산물이라는 것이다. 정말 canvas-y 같은 것을 하는 것이 아니라면 사용을 피하라.
Normally, when a value is out of the range of the element type, modulo arithmetic is used to convert it to a value within range. For signed and unsigned integers that means that: 일반적으로 어떤 값이 요소 타입의 범위를 벗어나게 되면, 모듈로 연산을 통해 범위 안의 값으로 변환한다. signed/unsigned integers에서는 다음과 같은 의미를 갖는다.
- The highest value plus one is converted to the lowest value (0 for unsigned integers).
- 가장 높은 값에 1을 더하면 가장 낮은 값으로 변한다. (0은 unsingned integers )
- The lowest value minus one is converted to the highest value.
- 가장 낮은 값에서 1을 빼면 가장 높은 값으로 변한다.
Modulo conversion for unsigned 8-bit integers: unsigned 8비트 인티저의 모듈로 변환 예시 :
> const uint8 = new Uint8Array(1);
> uint8[0] = 255; uint8[0] // highest value within range
255
> uint8[0] = 256; uint8[0] // overflow
0
> uint8[0] = 0; uint8[0] // lowest value within range
0
> uint8[0] = -1; uint8[0] // underflow
255
Modulo conversion for signed 8-bit integers: signed 8비트 인티저의 모듈로 변환 예시 :
> const int8 = new Int8Array(1);
> int8[0] = 127; int8[0] // highest value within range
127
> int8[0] = 128; int8[0] // overflow
-128
> int8[0] = -128; int8[0] // lowest value within range
-128
> int8[0] = -129; int8[0] // underflow
127
Clamped conversion is different: 클램프 변환은 다르다.
- All underflowing values are converted to the lowest value.
- 모든 언더플로 값은 가장 작은 값으로 변한다.
- All overflowing values are converted to the highest value.
- 모든 오버플로 값은 가장 높은 값으로 변한다.
> const uint8c = new Uint8ClampedArray(1);
> uint8c[0] = 255; uint8c[0] // highest value within range
255
> uint8c[0] = 256; uint8c[0] // overflow
255
> uint8c[0] = 0; uint8c[0] // lowest value within range
0
> uint8c[0] = -1; uint8c[0] // underflow
0Whenever a type (such as Uint16) is stored as multiple bytes, endianness matters:
타입이 (Uint16 같이) 멀티 바이트로 저장될 경우 엔디언 문제가 발생한다.
- Big endian: the most significant byte comes first. For example, the
Uint16value 0xABCD is stored as two bytes – first 0xAB, then 0xCD. - 빅 엔디언(Big endian) : 가장 큰 단위의 바이트가 먼저 오는 것이다. 예를 들어
Unint16값 0xABCD는 2바이트로 저장되는데, 0xAB가 먼저오고, 그 뒤로 0xCD가 온다. - Little endian: the least significant byte comes first. For example, the
Uint16value 0xABCD is stored as two bytes – first 0xCD, then 0xAB. - 리틀 엔디언(Little endian) : 가장 작은 단위의 바이트가 먼저 오는 것이다. 예를 들어
Unint16값 0xABCD는 2바이트로 저장되는데, 0xCD가 먼저오고, 그 뒤로 0xAB가 온다.
Endianness tends to be fixed per CPU architecture and consistent across native APIs. Typed Arrays are used to communicate with those APIs, which is why their endianness follows the endianness of the platform and can’t be changed. 엔디언은 CPU 아키텍처를 따르고, 네이티브 API를 통틀어 일관성을 유지하려는 경향이 있다. 형지정 배열은 이런 API와 통신을 하기위해 사용되는데, 이는 플래폼의 엔디언을 따르고 변경할 수 없는 원인이 된다.
On the other hand, the endianness of protocols and binary files varies and is fixed across platforms. Therefore, we must be able to access data with either endianness. DataViews serve this use case and let you specify endianness when you get or set a value. 반면에 프로토콜의 엔디언과 이진 파일은 플래폼과 무관하게 다양하고, 고정되어 있다. 그러므로 우리는 모든 방식의 엔디언에 접근할 수 있어야만 한다. DataViews는 이러한 다양한 사례를 제공해주고, 사용자가 값을 얻거나, 저장할 때 엔디언을 특정할 수 있도록 해준다.
- Big-endian representation is the most common convention in data networking; fields in the protocols of the Internet protocol suite, such as IPv4, IPv6, TCP, and UDP, are transmitted in big-endian order. For this reason, big-endian byte order is also referred to as network byte order.
- 빅엔디언 표현은 데이터 네트워킹에서 매우 일반적인 규칙이다. IPv4나 IPv6, TCP, UDP 등과 같은 인터넷 프로토콜 스위트의 프로토콜 영역에서는 빅엔디언 순서로 전송된다. 이 때문에 빅엔디언 바이트 순서는 또한 네트워크 바이트 순서라고도 한다.
- Little-endian storage is popular for microprocessors in part due to significant historical influence on microprocessor designs by Intel Corporation.
- 리틀엔디언 저장소는 주로 마이크로프로서 쓰이는데, 이는 인텔에서 디자인한 마이크로프로세서에 역사적으로 막대한 영향을 받았기 때문이다.
You can use the following function to determine the endianness of a platform. 다음 함수를 사용함으로써 플래폼의 엔디언을 결정할 수 있다.
const BIG_ENDIAN = Symbol('BIG_ENDIAN');
const LITTLE_ENDIAN = Symbol('LITTLE_ENDIAN');
function getPlatformEndianness() {
    const arr32 = Uint32Array.of(0x12345678);
    const arr8 = new Uint8Array(arr32.buffer);
    switch ((arr8[0]*0x1000000) + (arr8[1]*0x10000) + (arr8[2]*0x100) + (arr8\[3])) {
        case 0x12345678:
            return BIG_ENDIAN;
        case 0x78563412:
            return LITTLE_ENDIAN;
        default:
            throw new Error('Unknown endianness');
    }
}
There are also platforms that arrange words (pairs of bytes) with a different endianness than bytes inside words. That is called mixed endianness. Should you want to support such a platform then it is easy to extend the previous code. 플래폼 중에서 문자(바이트 짝)을 문자 안의 바이트보다는 다른 엔디언으로 정리할 때도 있다. 이를 혼합(mixed) 엔디언이라고 한다. 이러한 플래폼을 지원하고 싶다면, 위의 코드를 확장하는 것편이 나을 것이다.
With the bracket operator [ ], you can only use non-negative indices (starting at 0). The methods of ArrayBuffers, Typed Arrays and DataViews work differently: every index can be negative. If it is, it counts backwards from the length. In other words, it is added to the length to produce a normal index. Therefore -1 refers to the last element, -2 to the second-last, etc. Methods of normal Arrays work the same way.
[ ] 안에는 음수가 아닌 (0으로 시작하는) 인덱스만을 넣을 수 있다. 배열 버퍼의 메소드와 형지정 배열, DataViews는 서로 다르게 동작한다. 모든 인덱스는 음수가 될 수 있다. 그렇다면, 길이를 뒤에서부터 셀 수도 있을 것이다. 다시 말해, 일반적인 인덱스를 만들기 위해 길이에 더해진다. 그러므로 -1은 마지막 요소를 가리키며, -2는 뒤에서 두번째, 그리고 나머지는 마찬가지다. 일반적인 배열의 메소드도 동일하다.
> const ui8 = Uint8Array.of(0, 1, 2);
> ui8.slice(-1)
Uint8Array [ 2 ]
Offsets, on the other hand, must be non-negative. If, for example, you pass -1 to:
반면에 오프셋은 절대 음수여서는 안된다. 예를 들어 다음과 같이 -1을 넣는다면
DataView.prototype.getInt8(byteOffset)then you get a RangeError.
RangeError 가 발생한다.
ArrayBuffers store the data, views (Typed Arrays and DataViews) let you read and change it. In order to create a DataView, you need to provide its constructor with an ArrayBuffer. Typed Array constructors can optionally create an ArrayBuffer for you. 배열버퍼는 데이터를 저장하고, 뷰(형지정 배열과 DataView)는 그것을 읽고 변경할 수 있게 해준다. DataView 를 만들기 위해서는 배열버퍼를 갖고 있는 생성자를 만들어줘야 한다. 형지정 배열 생성자는 선택적으로 배열버퍼를 만들 수 있게 해준다.
The signature of the constructor is: 생성자 시그니처는 다음과 같다.
ArrayBuffer(length : number)Invoking this constructor via new creates an instance whose capacity is length bytes. Each of those bytes is initially 0.
new 연산자를 통해 이 생성자를 호출하면, length 만큼의 저장공간을 갖고 있는 인스턴스가 만들어진다. 각각의 바이트의 초깃값은 0이다.
ArrayBuffer.isView(arg)Returnstrueifargis an object and a view for an ArrayBuffer. Only Typed Arrays and DataViews have the required internal property[[ViewedArrayBuffer]]. That means that this check is roughly equivalent to checking whetherargis an instance of a Typed Array or ofDataView.arg가 객체이고, 배열버퍼의 뷰이면true를 반환하다. 오직 형지정 배열과 DataViews 에만 필수 내장 프로퍼티인[[ViewedArrayBuffer]]가 있다. 이는 이렇게 확인는 것이 대략적으로나마arg가 배열버퍼나DataView의 인스턴스인지 아닌지를 체크하는 것과 비슷하다는 의미이다.
get ArrayBuffer.prototype.byteLengthReturns the capacity of this ArrayBuffer in bytes. 배열버퍼의 바이트 저장 가능 길이를 리턴한다.ArrayBuffer.prototype.slice(start, end)Creates a new ArrayBuffer that contains the bytes of this ArrayBuffer whose indices are greater than or equal tostartand less thanend.startandendcan be negative (see Sect. “Negative indices”). 인덱스가start보다 크거나 같고,end보다는 작은 배열버퍼의 바이트를 담고있는 새로운 배열버퍼를 만든다.start와end는 음수가 될 수도 있다. (다음 섹션을 볼 것 “음수 인덱스”)
The various kinds of Typed Array are only different w.r.t. to the type of their elements: 다양한 형태의 형지정 배열은 단지 요소의 타입에 따라 달라지는 것이다.
- Typed Arrays whose elements are integers:
Int8Array,Uint8Array,Uint8ClampedArray,Int16Array,Uint16Array,Int32Array,Uint32Array - 인티저형 형지정 배열 :
Int8Array,Uint8Array,Uint8ClampedArray,Int16Array,Uint16Array,Int32Array,Uint32Array - Typed Arrays whose elements are floats:
Float32Array,Float64Array - 플로트형 형지정 배열 :
Float32Array,Float64Array
Typed Arrays are much like normal Arrays: they have a length, elements can be accessed via the bracket operator [ ] and they have all of the standard Array methods. They differ from Arrays in the following ways:
형지정 배열은 일반 배열과 거의 비슷하다. 둘다 length가 있고, 각괄호 [ ]를 통해 요소에 접근하며, 표준 배열 메소드를 갖고 있다. 다른 점은 다음과 같다.
- All of their elements have the same type, setting elements converts values to that type.
- 모든 배열 요소는 동일한 타입이며, 세팅한 요소는 해당 타입의 값으로 변환 된다.
- They are contiguous. Normal Arrays can have holes (indices in the range [0,
arr.length) that have no associated element), Typed Arrays can’t. - 요소들은 연속적이다. 일반 배열은 ([0,
arr.length] 범위 안에 있는 인덱스 중) 관련 요소가 없는 _빈요소_가 없다. - Initialized with zeros. This is a consequence of the previous item:
- 0으로 초기화 된다. 이것은 앞선 아이템의 결과이다.
new Array(10)creates a normal Array without any elements (it only has holes).new Array(10)은 아무런 요소가 없는 일반 배열을 만든다.(빈요소만 존재한다.)new Uint8Array(10)creates a Typed Array whose 10 elements are all 0.new Uint8Array(10)은 10개의 요소가 모두 0인 형지정 배열을 만든다.
- An associated buffer. The elements of a Typed Array
taare not stored inta, they are stored in an associated ArrayBuffer that can be accessed viata.buffer. - 연관 버퍼. 형지정 배열
ta의 요소는ta에 저장되지 않고,ta.buffer로 접근 가능한 연관 배열버퍼에 저장된다.
Typed Arrays implement a method whose key is Symbol.iterator and are therefore iterable (consult chapter “Iterables and iterators” for more information). That means that you can use the for-of loop and similar mechanisms in ES6:
형지정 배열은 Symbol.iterator가 키인 메소드를 상속받고 있기 때문에 이터러블하다. (더 많은 자료는 이터터블과 이터레이터(Iterables and iterators) 장을 참고 할 것) 이는 for-of 루프와 ES6의 비슷한 메커니즘을 사용할 수 있다는 뜻이다.
const ui8 = Uint8Array.of(0,1,2);
for (const byte of ui8) {
    console.log(byte);
}
// Output:
// 0
// 1
// 2
ArrayBuffers and DataViews are not iterable. 배열버퍼와 DataView는 이터러블하지 않다.
To convert a normal Array to a Typed Array, you make it the parameter of a Typed Array constructor. For example: 일반 배열을 형지정 배열로 변환하려면 형지정 배열의 생성자에 인자값으로 넣으면 된다. 예를 들어
> const tarr = new Uint8Array([0,1,2]);The classic way to convert a Typed Array to an Array is to invoke Array.prototype.slice on it. This trick works for all Array-like objects (such as arguments) and Typed Arrays are Array-like.
형지정 배열을 일반 배열로 변환하는 전통적인 방법은 Array.prototype.slice를 호출하는 것이다. 이 트릭은 모든 (arguments 같은) 유사 배열 객체에 사용 가능하고, 형지정 배열은 유사 배열이다.
> Array.prototype.slice.call(tarr)
[ 0, 1, 2 ]
In ES6, you can use the spread operator (...), because Typed Arrays are iterable:
ES6에서는 형지정 배열이 이터러블하므로 펼침 연산자(...)도 사용할 수 있다.
> [...tarr]
[ 0, 1, 2 ]
Another ES6 alternative is Array.from(), which works with either iterables or Array-like objects:
다른 ES6 대체 구현체는 Array.from()인데, 이는 이터러블 객체 뿐만 아니라 유사 배열 객체에도 사용 가능하다.
> Array.from(tarr)
[ 0, 1, 2 ]Some methods create new instances that are similar to this. The species pattern lets you configure what constructor should be used to do so. For example, if you create a subclass MyArray of Array then the default is that map() creates instances of MyArray. If you want it to create instances of Array, you can use the species pattern to make that happen. Details are explained in Sect “The species pattern” in the chapter on classes.
몇가지 메소드들은 this와 유사한 새로운 인스턴스를 생성한다. 종 패턴은 생성자가 어떻게 사용되야 할지 설정할 수 있게 해준다. 예를 들어 MyArray라는 Arrya의 서브클래스를 만든다면, map()이 MyArray의 인슨턴스를 만드는 것이 기본 설정이다. 만약 Array의 인스턴스로 만들고 싶다면 종 패턴을 사용하면 된다. 자세한 설명은 클라스 장에 있는 “종 패턴”에 잘 나와있다.
ArrayBuffers use the species pattern in the following locations: 배열버퍼는 다음 장소에서 종 패턴을 사용한다.
ArrayBuffer.prototype.slice()- Whenever an ArrayBuffer is cloned inside a Typed Array or DataView.
- 형지정 배열이나 DataView 내부의 배열버퍼가 복제될 때마다.
Typed Arrays use the species pattern in the following locations: 형지정 배열은 종 패턴을 다음 장소에서 사용한다.
TypedArray<T>.prototype.filter()TypedArray<T>.prototype.map()TypedArray<T>.prototype.slice()TypedArray<T>.prototype.subarray()
DataViews don’t use the species pattern. DataView는 종 패턴을 사용하지 않는다.
As you could see in the diagram at the beginning of this chapter, all Typed Array classes (Uint8Array etc.) have a common superclass. I’m calling that superclass TypedArray, but it is not directly accessible from JavaScript (the ES6 specification calls it the intrinsic object %TypedArray%). TypedArray.prototype houses all methods of Typed Arrays.
이 장 앞쪽의 다이어그램에서 볼 수 있듯이 (Uint8Array 등) 모든 형지정 배열은 하나의 공통 슈퍼클래스를 갖고 있다. 나는 이것을 슈퍼클래스 TypedArray라고 부르는데, 자바스크립트에서 직접 접근할 수는 없다(ES6 스펙에서는 이를 내장 오브젝트 %TypedArray% 라고 한다). TypedArray.prototype은 모든 형지정 배열의 메소드를 담고 있다.
Both static TypedArray methods are inherited by its subclasses .
(Uint8Array 등) 모든 정적 TypedArray 메소드는 슈퍼클래스를 상속받는다.
This method has the signature: 이 메소드는 다음 시그니처를 갖는다.
TypedArray.of(...items)It creates a new Typed Array that is an instance of this (the class on which of() was invoked). The elements of that instance are the parameters of of().
이는 this(of()가 호출된 클래스) 대신 새로운 형지정 배열을 만든다. 해당 인스턴스의 요소는 of()의 인자이다.
You can think of of() as a custom literal for Typed Arrays:
of()를 형지정 배열을 위한 커스텀 문자열로 여겨도 된다.
> Float32Array.of(0.151, -8, 3.7)
Float32Array [ 0.151, -8, 3.7 ]This method has the signature: 이 메소드는 다음과 같은 시그니처를 갖고 있따.
TypedArray<U>.from(source : Iterable<T>, mapfn? : T => U, thisArg?)It converts the iterable source into an instance of this (a Typed Array).
이는 이터러블 source를 this(형지정 배열)의 인스턴스로 바꿔준다.
For example, normal Arrays are iterable and can be converted with this method:
예를 들어 일반 배열은 이터러블하고 이 메소드로 변경 가능하다. :
> Uint16Array.from([0, 1, 2])
Uint16Array [ 0, 1, 2 ]
Typed Arrays are iterable, too: 형지정 배열 역시 이터러블하다.
> const ui16 = Uint16Array.from(Uint8Array.of(0, 1, 2));
> ui16 instanceof Uint16Array
true
The optional mapfn lets you transform the elements of source before they become elements of the result. Why perform the two steps mapping and conversion in one go? Compared to performing the first step separately, via source.map(), there are two advantages:
선택적 mapfn source의 요소를 결과의 요소가 되기 전으로 변경할 수 있도록 해준다. 왜 매핑(mapping) 과 _컨벤션(conversion)_의 2가지 일을 한번에 수행할까? source.map()로 첫 번째 단계를 분리하여 수행하는 것과 비교해 보면 두 가지 이점이 있다.
- No intermediate Array or Typed Array is needed.
- 중간에 배열이나 형지정 배열이 필요 없다.
- When converting a Typed Array to a Typed Array whose elements have a higher precision, the mapping step can make use of that higher precision.
- 한 형지정 배열을 정밀도가 더 높은 요소를 형지정 배열로 변환 할 때 매핑 단계에서 더 높은 정밀도의 배열을 활용할 수 있다.
To illustrate the second advantage, let’s use map() to double the elements of a Typed Array:
2번째 이점을 알아보기 위해 map() 을 사용하여 형지정 배열의 요소의 값을 2배로 만들어 보자.
> Int8Array.of(127, 126, 125).map(x => 2 * x)
Int8Array [ -2, -4, -6 ]
As you can see, the values overflow and are coerced into the Int8 range of values. If map via from(), you can choose the type of the result so that values don’t overflow:
보다시피 값들이 오버플로되고 Int8 범위의 값들로 강제로 변경되었다. 만약 from()을 통해 맵을 하면 결과값의 타입을 선택할 수 있고, 요소 값들은 오버플로되지 않을 것이다.
> Int16Array.from(Int8Array.of(127, 126, 125), x => 2 * x)
Int16Array [ 254, 252, 250 ]
According to Allen Wirfs-Brock, mapping between Typed Arrays was what motivated the mapfn parameter of from().
Allen Wirfs-Brock에 따르면, mapping between Typed Arrays was what motivated the mapfn parameter of from().
형지정 배열간의 매핑은 from()의 mapfn 인자에 달렸다고 한다.
Indices accepted by Typed Array methods can be negative (they work like traditional Array methods that way). Offsets must be non-negative. For details, see Sect. “Negative indices”. 형지정 배열 메소드 들이 받는 인덱스는 음수가 될 수 있다(전통적인 배열 메소드가 그런 방식으로 동작한다). 자세한 내용은 “음수 인덱스”를 참고할 것.
The following properties are specific to Typed Arrays, normal Arrays don’t have them: 다음 프로퍼티는 형지정 배열에만 존재하고, 일반 배열에는 없는 것들이다.
-
get TypedArray<T>.prototype.buffer : ArrayBufferReturns the buffer backing this Typed Array. 해당 형지정 배열의 배열 버퍼를 반환한다. -
get TypedArray<T>.prototype.byteLength : numberReturns the size in bytes of this Typed Array’s buffer. 해당 형지정 배열의 사이즈를 배열한다. -
get TypedArray<T>.prototype.byteOffset : numberReturns the offset where this Typed Array “starts” inside its ArrayBuffer. 해당 형지정 배열 내부의 배열버퍼의 "시작점(start)"의 오프셋을 반환한다. -
TypedArray<T>.prototype.set(arrayOrTypedArray, offset=0) : voidCopies all elements ofarrayOrTypedArrayto this Typed Array. The element at index 0 ofarrayOrTypedArrayis written to indexoffsetof this Typed Array (etc.).- If
arrayOrTypedArrayis a normal Array, its elements are converted to numbers who are then converted to the element typeTof this Typed Array. - If
arrayOrTypedArrayis a Typed Array then each of its elements is converted directly to the appropriate type for this Typed Array. If both Typed Arrays have the same element type then faster, byte-wise copying is used.
- If
-
TypedArray<T>.prototype.subarray(begin=0, end=this.length) : TypedArray<T>Returns a new Typed Array that has the same buffer as this Typed Array, but a (generally) smaller range. Ifbeginis non-negative then the first element of the resulting Typed Array isthis[begin], the secondthis[begin+1](etc.). Ifbeginin negative, it is converted appropriately.
The following methods are basically the same as the methods of normal Arrays: 다음 메소드는 기본적으로 일반 배열과 동일하다.
TypedArray<T>.prototype.copyWithin(target : number, start : number, end = this.length) : ThisCopies the elements whose indices are betweenstart(including) andend(excluding) to indices starting attarget. If the ranges overlap and the former range comes first then elements are copied in reverse order to avoid overwriting source elements before they are copied.TypedArray<T>.prototype.entries() : Iterable<[number,T]>Returns an iterable over [index,element] pairs for this Typed Array.TypedArray<T>.prototype.every(callbackfn, thisArg?)Returnstrueifcallbackfnreturnstruefor every element of this Typed Array. Otherwise, it returnsfalse.every()stops processing the first timecallbackfnreturnsfalse.TypedArray<T>.prototype.fill(value, start=0, end=this.length) : voidSet the elements whose indices range fromstarttoendtovalue.TypedArray<T>.prototype.filter(callbackfn, thisArg?) : TypedArray<T>Returns a Typed Array that contains every element of this Typed Array for whichcallbackfnreturnstrue. In general, the result is shorter than this Typed Array.TypedArray<T>.prototype.find(predicate : T => boolean, thisArg?) : TReturns the first element for which the functionpredicatereturnstrue.TypedArray<T>.prototype.findIndex(predicate : T => boolean, thisArg?) : numberReturns the index of the first element for whichpredicatereturnstrue.TypedArray<T>.prototype.forEach(callbackfn, thisArg?) : voidIterates over this Typed Array and invokescallbackfnfor each element.TypedArray<T>.prototype.indexOf(searchElement, fromIndex=0) : numberReturns the index of the first element that strictly equalssearchElement. The search starts atfromIndex.TypedArray<T>.prototype.join(separator : string = ',') : stringConverts all elements to strings and concatenates them, separated byseparator.TypedArray<T>.prototype.keys() : Iterable<number>Returns an iterable over the indices of this Typed Array.TypedArray<T>.prototype.lastIndexOf(searchElement, fromIndex?) : numberReturns the index of the last element that strictly equalssearchElement. The search starts atfromIndex, backwards.get TypedArray<T>.prototype.length : numberReturns the length of this Typed Array.TypedArray<T>.prototype.map(callbackfn, thisArg?) : TypedArray<T>Returns a new Typed Array in which every element is the result of applyingcallbackfnto the corresponding element of this Typed Array.TypedArray<T>.prototype.reduce(callbackfn : (previousValue : any, currentElement : T, currentIndex : number, array : TypedArray<T>) => any, initialValue?) : anycallbackfnis fed one element at a time, together with the result that was computed so far and computes a new result. Elements are visited from left to right.TypedArray<T>.prototype.reduceRight(callbackfn : (previousValue : any, currentElement : T, currentIndex : number, array : TypedArray<T>) => any, initialValue?) : anycallbackfnis fed one element at a time, together with the result that was computed so far and computes a new result. Elements are visited from right to left.TypedArray<T>.prototype.reverse() : ThisReverses the order of the elements of this Typed Array and returnsthis.TypedArray<T>.prototype.slice(start=0, end=this.length) : TypedArray<T>Create a new Typed Array that only has the elements of this Typed Array whose indices are betweenstart(including) andend(excluding).TypedArray<T>.prototype.some(callbackfn, thisArg?)Returnstrueifcallbackfnreturnstruefor at least one element of this Typed Array. Otherwise, it returnsfalse.some()stops processing the first timecallbackfnreturnstrue.TypedArray<T>.prototype.sort(comparefn? : (number, number) => number)Sorts this Typed Array, as specified viacomparefn. Ifcomparefnis missing, sorting is done ascendingly, by comparing via the less-than operator (<).TypedArray<T>.prototype.toLocaleString(reserved1?, reserved2?)TypedArray<T>.prototype.toString()TypedArray<T>.prototype.values() : Iterable<T>Returns an iterable over the values of this Typed Array.
Due to all of these methods being available for Arrays, you can consult the following two sources to find out more about how they work: 위의 모든 메소드들은 일반 배열 메소드에서도 사용할 수 있기 때문에, 다음 두 가지 소스를 보고 어떻게 동작하는지 참고할 것.
- The following methods are new in ES6 and explained in chapter “New Array features”:
copyWithin,entries,fill,find,findIndex,keys,values. - All other methods are explained in chapter “Arrays” of “Speaking JavaScript”.
- 다른 메소드들은 "자바스크립트를 말하다"의 “배열” 장에서 확인 할 수 있다.
Note that while normal Array methods are generic (any Array-like this is OK), the methods listed in this section are not (this must be a Typed Array).
일반 배열 메소드들은 제네릭한 반면에(어떤 유사 배열이 this이든 괜찮다), 이 절에서 나열한 메소드들은 그렇지 않다(this는 형지정 배열이어야만 한다).
Each Typed Array constructor has a name that follows the pattern «ElementType»Array, where «ElementType» is one of the element types in the table at the beginning. That means that there are 9 constructors for Typed Arrays: Int8Array, Uint8Array, Uint8ClampedArray (element type Uint8C), Int16Array, Uint16Array, Int32Array, Uint32Array, Float32Array, Float64Array.
각각의 형지정 배열 생성자는 «ElementType»Array 패턴의 이름을 갖고 있고, ``«ElementType»은 처음 보여준 표의 요소 타입 중 하나이다. 따라서 형지정 배열에는 다음 9개의 생성자가 존재한다. Int8Array`, `Uint8Array`, `Uint8ClampedArray` (요소 타입 `Uint8C`), `Int16Array`, `Uint16Array`, `Int32Array`, `Uint32Array`, `Float32Array`, `Float64Array`.
Each constructor has five overloaded versions – it behaves differently depending on how many arguments it receives and what their types are: 각각의 생성자는 5개의 _오버로딩_버전이 존재하는데, 각각의 인자 타입과 개수에 따라 다르게 동작한다.
«ElementType»Array(buffer, byteOffset=0, length?)Creates a new Typed Array whose buffer isbuffer. It starts accessing the buffer at the givenbyteOffsetand will have the givenlength. Note thatlengthcounts elements of the Typed Array (with 1–4 bytes each), not bytes.«ElementType»Array(length)Creates a Typed Array with the givenlengthand the appropriate buffer (whose size in bytes islength * «ElementType»Array.BYTES_PER_ELEMENT).«ElementType»Array()Creates a Typed Array whoselengthis 0. It also creates an associated empty ArrayBuffer.«ElementType»Array(typedArray)Creates a new Typed Array that has the same length and elements astypedArray. Values that are too large or small are converted appropriately.«ElementType»Array(arrayLikeObject)TreatsarrayLikeObjectlike an Array and creates a new TypedArray that has the same length and elements. Values that are too large or small are converted appropriately.
The following code shows three different ways of creating the same Typed Array: 다음 코드는 동일한 형지정 배열을 생성하는 3가지 다른 방법을 보여준다.
const tarr1 = new Uint8Array([1,2,3]);

const tarr2 = Uint8Array.of(1,2,3);

const tarr3 = new Uint8Array(3);
tarr3[0] = 0;
tarr3[1] = 1;
tarr3[2] = 2;-
«ElementType»Array.BYTES_PER_ELEMENTCounts how many bytes are needed to store a single element: 요소 하나를 저장하기 위해서 얼마나 많은 바이트가 필요한지 센다.
Uint8Array.BYTES_PER_ELEMENT 1 Int16Array.BYTES_PER_ELEMENT 2 Float64Array.BYTES_PER_ELEMENT 8 ```
«ElementType»Array.prototype.BYTES_PER_ELEMENT«ElementType»Array.BYTES_PER_ELEMENT와 동일하다.
Typed Arrays don’t have a method concat(), like normal Arrays do. The work-around is to use the method
형지정 배열은 일반 배열과 달리 concat() 메소드가 따로 없다. 따라서 이를 사용하기 위해서는 우회해야 한다.
typedArray.set(arrayOrTypedArray, offset=0)That method copies an existing Typed Array (or normal Array) into typedArray at index offset. Then you only have to make sure that typedArray is big enough to hold all (Typed) Arrays you want to concatenate:
이 메소드는 형지정 배열(또는 일반 배열)을 offset위치에 있는 typeArray로 복사해 넣는다. 그러면 typeArray 를 합치고자하는 모든 (형지정) 배열의 크기 만큼만 만들어 주기만 하면 된다.
function concatenate(resultConstructor, ...arrays) {
    let totalLength = 0;
    for (const arr of arrays) {
        totalLength += arr.length;
    }
    const result = new resultConstructor(totalLength);
    let offset = 0;
    for (const arr of arrays) {
        result.set(arr, offset);
        offset += arr.length;
    }
    return result;
}
console.log(concatenate(Uint8Array, Uint8Array.of(1, 2), Uint8Array.of(3, 4)));
// Uint8Array [1, 2, 3, 4]DataView(buffer, byteOffset=0, byteLength=buffer.byteLength-byteOffset)Creates a new DataView whose data is stored in the ArrayBufferbuffer. By default, the new DataView can access all ofbuffer, the last two parameters allow you to change that.
get DataView.prototype.bufferReturns the ArrayBuffer of this DataView.get DataView.prototype.byteLengthReturns how many bytes can be accessed by this DataView.get DataView.prototype.byteOffsetReturns at which offset this DataView starts accessing the bytes in its buffer.DataView.prototype.get«ElementType»(byteOffset, littleEndian=false)Reads a value from the buffer of this DataView.«ElementType»can be:Float32,Float64,Int8,Int16,Int32,Uint8,Uint16,Uint32
DataView.prototype.set«ElementType»(byteOffset, value, littleEndian=false)Writesvalueto the buffer of this DataView.«ElementType»can be:Float32,Float64,Int8,Int16,Int32,Uint8,Uint16,Uint32
Typed Arrays have been around for a while, so there are quite a few browser APIs that support them. 형지정 배열은 그동안 계속 있었기 때문에 꽤 많은 브라우저 API가 이를 지원한다.
The file API lets you access local files. The following code demonstrates how to get the bytes of a submitted local file in an ArrayBuffer.
const fileInput = document.getElementById('fileInput');
const file = fileInput.files[0];
const reader = new FileReader();
reader.readAsArrayBuffer(file);
reader.onload = function () {
    const arrayBuffer = reader.result;
    ···
};In newer versions of the XMLHttpRequest API, you can have the results delivered in an ArrayBuffer:
const xhr = new XMLHttpRequest();
xhr.open('GET', someUrl);
xhr.responseType = 'arraybuffer';

xhr.onload = function () {
    const arrayBuffer = xhr.response;
    ···
};

xhr.send();Similarly to XMLHttpRequest, the Fetch API lets you request resources. But it is based on Promises, which makes it more convenient to use. The following code demonstrates how to download the content pointed to by url as an ArrayBuffer:
fetch(url)
.then(request => request.arrayBuffer())
.then(arrayBuffer => ···);Quoting the HTML5 specification:
The
canvaselement provides scripts with a resolution-dependent bitmap canvas, which can be used for rendering graphs, game graphics, art, or other visual images on the fly.
The 2D Context of canvas lets you retrieve the bitmap data as an instance of Uint8ClampedArray:
const canvas = document.getElementById('my_canvas');
const context = canvas.getContext('2d');
const imageData = context.getImageData(0, 0, canvas.width, canvas.height);
const uint8ClampedArray = imageData.data;WebSockets let you send and receive binary data via ArrayBuffers:
const socket = new WebSocket('ws://127.0.0.1:8081');
socket.binaryType = 'arraybuffer';

// Wait until socket is open
socket.addEventListener('open', function (event) {
    // Send binary data
    const typedArray = new Uint8Array(4);
    socket.send(typedArray.buffer);
});

// Receive binary data
socket.addEventListener('message', function (event) {
    const arrayBuffer = event.data;
    ···
});- WebGL uses the Typed Array API for: accessing buffer data, specifying pixels for texture mapping, reading pixel data, and more.
- The Web Audio API lets you decode audio data submitted via an ArrayBuffer.
- Media Source Extensions: The HTML media elements are currently
<audio>and<video>. The Media Source Extensions API enables you to create streams to be played via those elements. You can add binary data to such streams via ArrayBuffers, Typed Arrays or DataViews. - Communication with Web Workers: If you send data to a Worker via
postMessage(), either the message (which will be cloned) or the transferable objects can contain ArrayBuffers. - Cross-document communication: works similarly to communication with Web Workers and also uses the method
postMessage().
Github The code of the following example is on GitHub. And you can run it online.
The example is a web pages that lets you upload a JPEG file and parses its structure to determine the height and the width of the image and more.
A JPEG file is a sequence of segments (typed data). Each segment starts with the following four bytes:
- Marker (two bytes): declares what kind of data is stored in the segment. The first of the two bytes is always 0xFF. Each of the standard markers has a human readable name. For example, the marker 0xFFC0 has the name “Start Of Frame (Baseline DCT)”, short: “SOF0”.
- Length of segment (two bytes): how long is this segment (in bytes, including the length itself)?
JPEG files are big-endian on all platforms. Therefore, this example demonstrates how important it is that we can specify endianness when using DataViews.
The following function processArrayBuffer() is an abridged version of the actual code; I’ve removed a few error checks to reduce clutter. processArrayBuffer() receives an ArrayBuffer with the contents of the submitted JPEG file and iterates over its segments.
// JPEG is big endian
var IS_LITTLE_ENDIAN = false;

function processArrayBuffer(arrayBuffer) {
    try {
        var dv = new DataView(arrayBuffer);
        ···
        var ptr = 2;
        while (true) {
            ···
            var lastPtr = ptr;
            enforceValue(0xFF, dv.getUint8(ptr),
                'Not a marker');
            ptr++;
            var marker = dv.getUint8(ptr);
            ptr++;
            var len = dv.getUint16(ptr, IS_LITTLE_ENDIAN);
            ptr += len;
            logInfo('Marker: '+hex(marker)+' ('+len+' byte(s))');
            ···

            // Did we find what we were looking for?
            if (marker === 0xC0) { // SOF0
                logInfo(decodeSOF0(dv, lastPtr));
                break;
            }
        }
    } catch (e) {
        logError(e.message);
    }
}
This code uses the following helper functions (that are not shown here):
enforceValue()throws an error if the expected value (first parameter) doesn’t match the actual value (second parameter).logInfo()andlogError()display messages on the page.hex()turns a number into a string with two hexadecimal digits.
decodeSOF0() parses the segment SOF0:
function decodeSOF0(dv, start) {
    // Example (16x16):
    // FF C0 00 11 08 00 10 00 10 03 01 22 00 02 11 01 03 11 01
    var data = {};
    start += 4; // skip marker 0xFFC0 and segment length 0x0011
    var data = {
        bitsPerColorComponent: dv.getUint8(start), // usually 0x08
        imageHeight: dv.getUint16(start+1, IS_LITTLE_ENDIAN),
        imageWidth: dv.getUint16(start+3, IS_LITTLE_ENDIAN),
        numberOfColorComponents: dv.getUint8(start+5),
    };
    return JSON.stringify(data, null, 4);
}
More information on the structure of JPEG files:
- “JPEG: Syntax and structure” (on Wikipedia)
- “JPEG File Interchange Format: File format structure” (on Wikipedia)
Much of the Typed Array API is implemented by all modern JavaScript engines, but several features are new to ECMAScript 6: 대부분의 형지정 배열 API가 모던 자바스크립트 엔진에서 동작하지만, 다음 특징들은 ES6에서 새로 도입 된 것이다.
- Static methods borrowed from Arrays:
TypedArray<T>.from(),TypedArray<T>.of() - 배열에서 가져온 정적 메소드 :
TypedArray<T>.from(),TypedArray<T>.of() - Prototype methods borrowed from Arrays:
TypedArray<T>.prototype.map()etc. - 배열에서 가져온 프로토타입 메소드 :
TypedArray<T>.prototype.map()등. - Typed Arrays are iterable
- 형지정 배열은 이터러블하다.
- Support for the species pattern
- 종 패턴 지원
- An inheritance hierarchy where
TypedArray<T>is the superclass of all Typed Array classes TypedArray<T>가 모든 형지정 배열 클래스의 슈퍼클래스인 상속 구조인 점
It may take a while until these are available everywhere. As usual kangax’ “ES6 compatibility table” describes the status quo. 아마도 모든 곳에서 쓸 수 있게 되기까지는 시간이 좀 걸릴 것이다. 여느 때처럼 kangax’ “ES6 compatibility table”에서 확인 가능하다.