


I would like to give a special thank you to the OpenBCI team for their support and contribution during the development of this project. OpenBCI's generous donations and technical support played a critical role in bringing this project to fruition. Again, my sincere thanks to the OpenBCI team for their support, guidance and belief. Without their help, the success of this project would not have been possible.
This platform was built to modularize robotics development and experimentation with Python/C++ using Raspberry Pi/Jetson nano and Arduino.
chmod 777 install.sh
./install.sh
To use neopixels on Raspberry Pi, you need to disable the sound (see neopixel section).
./startup.sh
For manual control via keyboard
./manual_startup.sh
For control by thought through the brain
./bci_startup.sh
Contains a preview of the video feed to get started (not available via SSH)
./preview_startup.sh
python3 -m pytest --cov=modules --cov-report term-missing
Run sudo vim /etc/rc/local and add the following lines before exit 0:
python3 /home/Desktop/companion-robot/shutdown_pi.py
/home/Desktop/companion-robot/startup.sh
GPIO 26 is wired to enable shutdown when brought to ground via a switch.
The shutdown_pi.py script manages this.
Guide: https://howchoo.com/g/mwnlytk3zmm/how-to-add-a-power-button-to-your-raspberry-pi
Using Raspberry Pi camera or any webcam
8 servo control with Arduino serial connection (6 servo feet, 1 servo pan, 1 servo tilt)
It is integrated externally and via Arduino serial connection via software.
A buzzer is connected to GPIO 27 so that tones can be played when no sound is output (see Neopixel section).
https://github.com/gumslone/raspi_buzzer_player.git
An RCWL-0516 microwave radar sensor is attached to GPIO 13. This sensor, with its piservo module, will automatically scan 360 degrees like a radar when it enters a night loop
note: it contains two different piservos, one for nltk and one for motion sensor
NLTK analyzes a text and evaluates the degree to which the text is positive or negative. The antenna again uses the piservo control to perform an animation of this evaluation.
Uses Brain Computer Interface to control the robot with an OpenBCI Ultracortex Mark IV. More information about Brain Computer Interface: https://openbci.com/community/openbci-discovery-program-sentrybot-bci-cbi/
Reference Guide: https://openbci.com/community/use-your-imagination-power-to-control-robots-and-devices/
Thank you Rakesh C Jakati for publishing this article

Motor imagery (MI)-based brain-computer interface (BCI) is one of the core concepts of BCI. The user can generate induced activity from the motor cortex by imagining motor movements without any limb movements or external stimuli.
In this guide, we will learn how to use OpenBCI equipment for engine dreaming. To this end, we will design a BCI system that allows the user to control a system by imagining different movements of their limbs.
-
16 Channel or 8 Channel Cyton Board
-
Ultracortex EEG headset
-
ThinkPulse™ Active Electrodes
-
Computer with installed NeuroPype and OpenBCI GUI (I used Jetson Orin Nano, which is at the head of the Robot, as the computer)
-
How to connect hardware If you are using the assembled Ultracortex IV, all you need to do is place the spiky electrodes on the following 10-20 locations: C3 ,Cz, C4, P3, Pz, P4, O1, O2 and FPz. If you want to assemble the headset yourself follow tutorial from OpenBCI Documents.
Next, connect the electrodes to the Cyton board pins as shown on the table below.
| Electrode | Cyton Board Pin |
|---|---|
| C3 | Bottom N1P pin |
| Cz | Bottom N2P pin |
| C4 | Bottom N3P pin |
| P3 | Bottom N4P pin |
| Pz | Bottom N5P pin |
| P4 | Bottom N6P pin |
| O1 | Bottom N7P pin |
| O2 | Bottom N8P pin |
| Fpz | Bottom BIAS pin |
| Ear Clip | Bottom SRB pin (SRB2) |

Let us design a two-class BCI using the software NeuroPype. NeuroPype is free for academic users and you can get a 30 day trial if you are an individual/startup. You can get started with NeuroPype by clicking here.
Open the Neuropype Pipeline Designer application. Go to file and open Simple Motor Imagery Prediction with CSP. We will use the example provided by Neuropype software.

This pipeline uses EEG to predict whether you are currently imagining a specific limb movement (default: left-hand movement vs. right-hand movement for two-class classification). The output at any given moment is the probability that the person is imagining each type of movement. Because EEG patterns vary between individuals, several nodes (such as Common Spatial Patterns and Logistic Regression) need to adapt based on calibration data specific to the user. This calibration data cannot be arbitrary EEG data; it must meet certain criteria, which is true for most machine learning applications involving EEG data.
Firstly, the node must acquire examples of EEG data for both left-hand and right-hand movements. A single trial per class is insufficient; the node needs approximately 20–50 repetitions when using a full-sized EEG headset. Additionally, these trials must be presented in a more or less randomized order, rather than in blocks of all-left trials followed by all-right trials. This randomized approach is crucial to avoid common beginner mistakes in machine learning with time series data.

For the aforementioned reasons, the EEG signal must be annotated so that one can identify which data points correspond to Class 1 (subject imagines left-hand movement) and which correspond to Class 2 (subject imagines right-hand movement). One way to achieve this is by including a special 'trigger channel' in the EEG, which takes on predefined signal levels to encode different classes (e.g., 0=left, 1=right). In this case, the pipeline assumes that the data packets emitted by the LSL Input node include not just one EEG stream, but also a second stream that contains a list of marker strings along with their timestamps (markers). These are multi-stream packets, and thus, there are two data streams flowing through the entire pipeline. The markers are then interpreted by the rest of the pipeline to indicate the points in time where the EEG data corresponds to a particular class (in this pipeline, a marker with the string 'left' and timestamp 17.5 would indicate that the EEG at 17.5 seconds into the recording is of class 0, and if the marker was 'right', it would indicate class 1).
Of course, the data could contain various other random markers (e.g., 'recording-started', 'user-was-sneezing', 'enter-pressed'), so how does the pipeline determine which markers encode classes and what classes they represent? This binding is established by the Assign Targets node. The settings are shown below. The syntax means that 'left' strings map to class 0, 'right' maps to class 1, and all other strings don't map to anything.

The second question is, given that there’s a marker at 17.5 seconds, how does the pipeline determine where, relative to that point in time, to find the relevant EEG pattern that captures the imagined movement? Does it start a second before the marker and end a second after, or does it start at the marker and end 10 seconds later? Extracting the correct portion of the data is typically handled by the Segmentation node, which extracts segments of a specified length relative to each marker. The settings for this pipeline are shown in the picture above and are interpreted as follows: extract a segment that starts 0.5 seconds after each marker and ends 3.5 seconds after that marker (i.e., the segment is 3 seconds long). If you use negative numbers, you can place the segment before the marker.
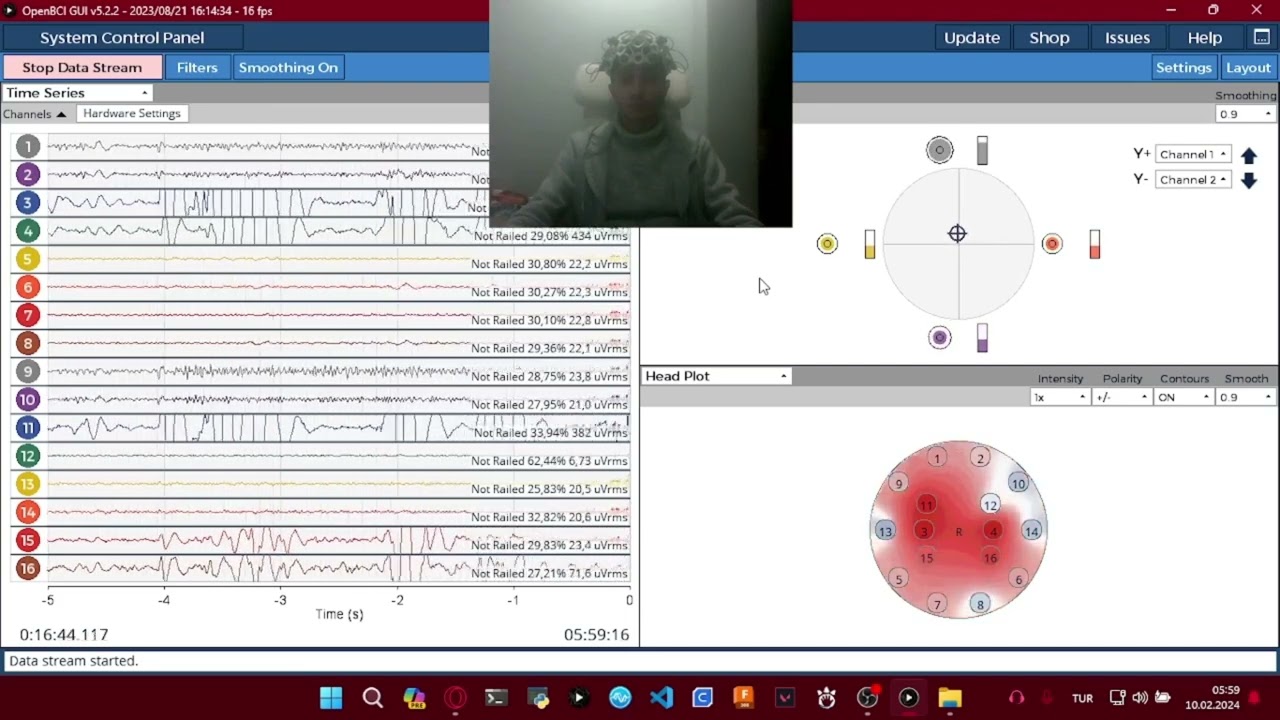
Plug in the RFduino dongle, connect electrodes to the cyton board pins. Wear the EEG headset and finally connect the ear clip to SRB. Open the OpenBCI GUI, select the appropriate port number and start streaming data from the Cyton board. Go to the networking tab and select the LSL protocol. Select “TIME-SERIES” data type and start streaming.


Before we start classifying the Motor Imagery data, we need to calibrate the system.
The NeuroPype pipeline is doing a great job, but wouldn’t it be nice if we didn’t have to recollect the calibration data each time we run it? It’s often more convenient to record calibration data into a file during the first session and load that file every time we run our pipeline. To achieve this, we need to use the Inject Calibration Data node, which has a second input port for piping in a calibration recording (imported here using Import XDF).
To begin, start the Lab Recorder and find the OpenBCI EEG stream in the window. Next, run the Python script motorimg_calibrate.py found in the extras folder of your NeuroPype installation. Then, update the streams in the Lab Recorder. You should now see both the MotorImag-Markers and obci_eeg1 streams along with your computer name.

The python script along with OpenBCI, lab recorder is used to record calibration data. The script sends markers matching what the person is imagining that is ‘Left’ or ‘Right’ and instructs the user when to imagine that movement which will be stored in the .xdf file along with the EEG data.
Run the python script and start recording the OpenBCI stream and markers stream using the lab recorder. Follow the instructions shown on the window: when the window shows ‘R’ imagine moving your right arm, and when it shows ‘L’ imagine moving your left arm. It takes about half a second for a person to read the instruction and begin imagining the movement, and he/she will finish about 3 seconds later and get ready for the next trial. This is why the segment time limits in segmentation node are set to (0.5,3.5).
You can configure the number of trials per class and other parameters in motorimg_calibrate.py.
You need to edit a few nodes in this pipeline. You should delete these three nodes (Import SET, Stream Data, LSL Output) at the bottom of the pipeline design as we will use our own recorded calibration data.

Delete these nodes from the Pipeline Design
Delete the Import Set node that is connected to Inject Calibration Data and replace it with Import XDF as the calibration data is recorded in .xdf format.


Enter the calibration data filename
Fill in the appropriate filename of the XDF file in the window.

The LSL Input node is responsible for returning a marker stream together with the EEG. Enter the name of the OpenBCI stream in the query and after you import the .xdf calibration data, you are ready to go.
OSC output node to stream data Connect an OSC (Open sound control) Output node to the Logistic Regression node in the pipeline designer and configure it as shown below before you stream the data.

Type in the IP address of the device to which you want to stream the data, which can be either an Arduino or a Raspberry Pi). Use 127.0.0.1 as an IP address if you want to receive the data on your local computer.

We are in the final stage of the Motor Imagery Classification pipeline design. To run the pipeline, follow these steps:
- Right-click on the NeuroPype icon in the taskbar and select "Run Pipeline."
- Navigate to your file path and select your edited pipeline file,
simplemotorimagery.pyp. - Run the pipeline.
If everything is configured properly, you will see two windows displaying the Classification and Misclassification Rate. You can now observe real-time predictions for either left or right movements in these windows. Imagine moving your right arm to increase the amplitude power of the right prediction and imagine moving your left arm to increase the amplitude power of the left prediction.

We are excited to announce upcoming updates for our project, which will include advanced features for the OpenBCI UltraCortex Mark IV. Here's what's coming next:
4-Way Control Mechanism: Enhance your experience with our new EMG joystick widget, allowing intuitive and precise control. Watch demo video to see it in action! Stay tuned for more updates as we continue to innovate and improve SentryBOT
GPIO 18, 19 and 20 are used to use stereo MEMS microphones as audio input.
Mic 3V - Connects to Pi 3.3V.
Mic GND - Connects to Pi GND.
Mic SEL - Pi connects to GND (this is used for channel selection, can be connected to 3.3V or GND).
Mic BCLK - Connects to BCM 18 (pin 12).
Mic DOUT - Connects to BCM 20 (pin 38).
Mic LRCL - connects to BCM 19 (pin 35).
https://learn.adafruit.com/adafruit-i2s-mems-microphone-breakout/raspberry-pi-wiring-test
cd ~
sudo pip3 install --upgrade adafruit-python-shell
wget https://raw.githubusercontent.com/adafruit/Raspberry-Pi-Installer-Scripts/master/i2smic.py
sudo python3 i2smic.py
arecord -l
arecord -D plughw:0 -c2 -r 48000 -f S32_LE -t wav -V stereo -v file_stereo.wav
Note: See additional configuration below to support voice recognition.
The original hot word detection used the now deprecated Snowboy. The files are still available in this repository:
https://github.com/dmt-labs/modular-biped/blob/feature/PR29_review/modules/hotword.py contains the module from this framework.
https://github.com/dmt-labs/modular-biped/tree/feature/PR29_review/modules/snowboy includes original snowboy functionality.
https://github.com/dmt-labs/modular-biped/tree/feature/PR29_review/modules/snowboy/resources/models contains trained models that can be used as keywords. It may be possible to find more on the internet.
A guide to training new models is available here, but there are resources for training new models on a Linux device.
Trigger word for voice recognition (not currently used): https://snowboy.kitt.ai/
Speech recognition is activated when a face is seen.
Make sure that the device_index value specified in the modules/speechinput.py file matches your microphone.
See scripts/speech.py to list and test input devices. See below for MEMS microphone configuration.
By default, the Adafruit I2S MEMS Microphone Breakout does not work with voice recognition.
The following configuration changes must be made to support voice recognition on MEMS microphone(s).
sudo apt-get install ladspa-sdk
Create /etc/asound.conf file with the following content:
pcm.pluglp {
     type ladspa
     slave.pcm "plughw:0"
     path "/usr/lib/ladspa"
     capture_plugins [
    {
       label hpf
       id 1042
    }
         {
                 label amp_mono
                 id 1048
                 input {
                     controls [ 30 ]
                 }
         }
     ]
}

pcm.lp {
     type plug
     slave.pcm pluglp
}
This ensures that the 'lp' device can be referenced in voice recognition. In the example below it is shown at index 18.
For example, the sample rate should be set to 16000.
mic = sr.Microphone(device_index=18, sample_rate=16000)
References:
To use the Raspberry Pi's serial port, getty (the program that displays the login screen) must be disabled.
sudo raspi-config -> Interfacing Options -> Serial -> "Would you like a login shell to be accessible over serial" = 'No'. Restart
Connect GPIO pins 14 and 15 (tx and rx) of the Raspberry Pi to the Arduino tx and rx pins (tx -> rx in both direction and direction reversal!) via a logic level shifter, since Raspberry Pi 3v3 and Arduino (probably) It is 5v.
To upload via serial pins, press the reset button on the Arduino at the point where the IDE starts 'uploading' (after compiling); otherwise a synchronization error will be displayed.
WS1820B support is provided via Pi GPIO pin 12. Unfortunately, audio on the Pi must be disabled to support this.
sudo vim /boot/config.txt
#dtparam=audio=on
Therefore, the application must be run with sudo.
If you want to use neopixels without using the driver (and no audio output), set pin to 12 in the configuration and set i2c to False. The application must also be run with sudo.
https://learn.adafruit.com/neopixels-on-raspberry-pi/python-usage
The live translation module translation.py allows live translation of logs and TTS output via Google Translate.
Call the translate.request(msg) function and optionally specify the source and target languages.
config/translation.yml specifies the default languages.
The prefabricated PCBs of this project are available in the circuits folder. This provides connectivity between core components as described above.

